1. Introduction #
Since Power Automate contains many things, some things are described below, including how they can be used in conjunction with each other. In addition, there are more specific sections about the parts that are too large to be included in this section. Since Power Automate is in constant development, some things described below and in related sections may be outdated. However, I try to keep it updated continuously.
| Name | Note | Link |
| Technical setup | Review how to set up a power automation environment | https://www.rpahelp.org/docs/power-automate-teknisk-setup/ |
| Cloud Flow | Cloud flows in brief | https://www.rpahelp.org/docs/power-automate-cloud-flow/ |
| Desktop Flow | Tips and tricks for working with Power Automate Desktop, RPA software | https://www.rpahelp.org/docs/power-automate-desktop-tips-og-trick/ |
| Orphan flow | Describes how to handle flows where the owner’s user is deleted | https://learn.microsoft.com/en-us/troubleshoot/power-platform/power-automate/flow-management/manage-orphan-flow-when-owner-leaves-org |
1.1 Understanding private vs. publicly displayed content #
Basically, things in an environment are private until they are associated with a solution or shared with others. Below are described the three most commonly used things in a Power Automate environment.
| Name | Generally | Linked to solution |
| Cloud flow | Private to shared | Public, can only be found in solutions from now on ( either in the default solution or a given one ) rather than under My flows |
| Desktop flow | Private until shared, additionally system administrator can always see everyone in the environment | Public |
| Connection | Completely private as a starting point, however some types can be shared | For reference only, owner must continue to maintain these locally if changes occur |
1.2 Default Solution #
In the Power Automate environment, there is a Default Solution that contains everything in that environment that is available across users. It can be used for any cleanups you need.

Here is an example. Please note that specifically for cloud flows , only those associated with a solution will appear in this list. Those that are private at the user level will still only be accessible by the users they are shared with.

2. Connections (credentials) #
Please note that since the section was written, it has become possible to create real credentials (username/password) that can be used as an alternative to connections (username/password for a specific program ).
Connections are credentials where you create a connection specifically to what you need. There are a lot of built-in options that can subsequently be used in cloud flows. If you use Active Directory Federation Services (ADFS) , this can stop a user from adding another user’s login as a Connection (even if you log in with the user’s credentials, it overrides with that user as logged in on the machine in question instead). You can get around this by creating email accounts through onmicrosoft.com rather than your own domain, which is affected by ADFS . Afterwards it works without problems.
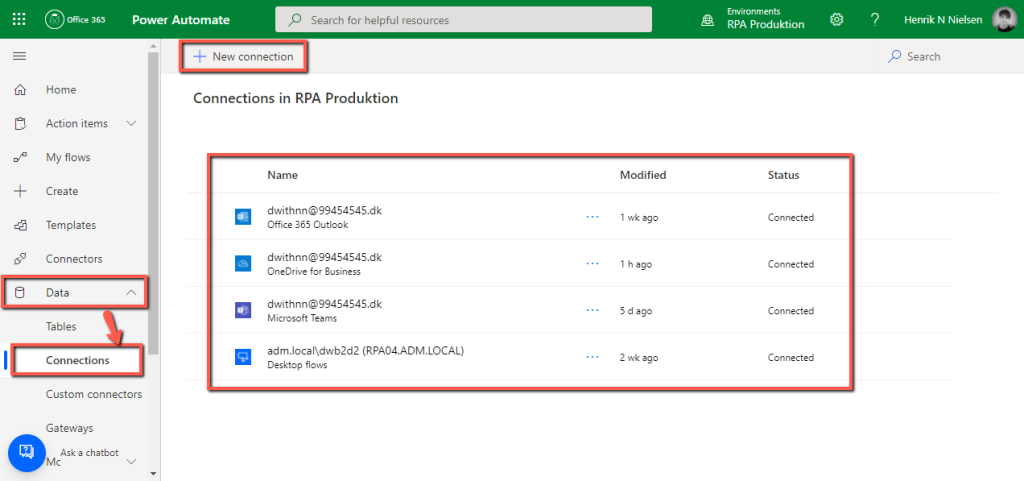
2.1 Connection References #
While Connections cannot be shared by default, you can create a reference to your own, making them accessible to others. As a note, it is best to associate credentials with a service account if they are to be shared widely and maintained by everyone.
This is done by opening any solution, and then under New – More – Connection Reference .

Then fill in the fields. You select which type of Connector you are talking about, and then you get a list of the connectors you have of that type that you can choose from.

In the future, others can use and possibly add the connection reference to other solutions. It will still be the owner who must update it if the need arises, however.

It is possible to delete a connection reference again if it is no longer needed. This is done from a solution it is located in, from here you can select Delete from this environment , to remove it completely from public view. This only removes references from the dataverse , and the connection itself will still be with the user in question who owns it privately afterwards. It is for the same reason that you should store connections used in production on a service account , so that they do not have to be created again if a user is deleted.

3. Solutions #
3.1 Introduction #
A solution can be considered a kind of folder in which you can insert references to various power things you may want. You can compare a solution to a folder in a Windows environment with shortcuts in it. When things are placed in a solution , everyone with access to the environment basically has viewing and editing rights to these. At the time of writing, it is not possible to create access control on solutions .

In the same way, in a solution , we can have all sorts of different things associated with it. However, these are again a kind of shortcuts that point into our Environment , and further into the dataverse where they are actually stored (note that everything in a solution is in the dataverse, but only things from the same environment can be added to a solution). This means that you can have, for example, a desktop flow that is in many solutions . However, there is still only one desktop flow , although there can be many references to it. In other words, a one-to-many relationship.
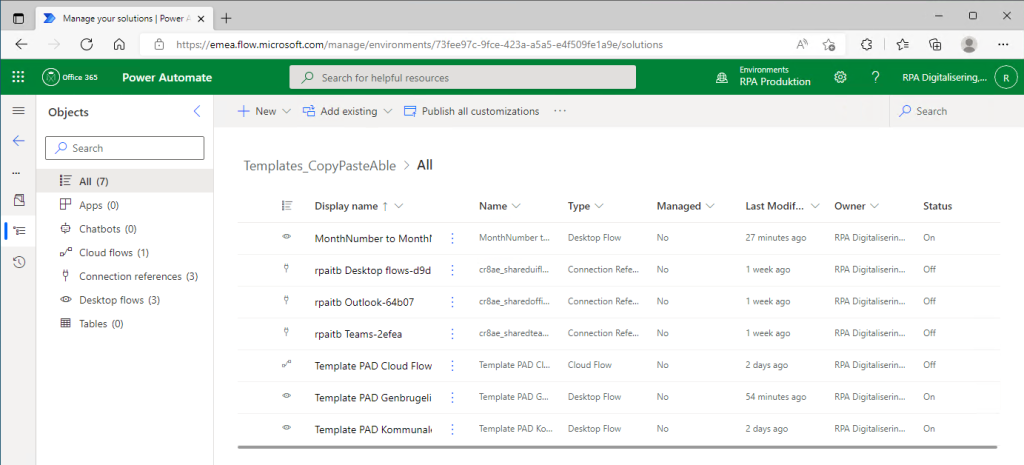
As in the example below, there are several desktop flows , connection references and dives that are also included in other solutions . It can therefore be an advantage to add everything that has to do with your solution , so it is easy and quick to get an overview and maintain for others later.
Please note that cloud flows that are now part of a solution can no longer be found under My flows , but only under Solutions . This also applies even if they were not originally created under a solution, but were created as a cloud flow under My flows . Desktop flows, on the other hand, can still be found under My flows after they are added to a solution, if you have the system administrator role.
3.2 Where did my cloud flow go? #
3.3. Navngivning af Solutions #
If you have more than one user in your RPA environment, you can optionally write which robot owns/runs the process in front of it. This can make it clearer and easier to see which processes belong to which robot, in addition to making it easier to sort.

4. Flows ( Cloud, Desktop ) #
4.1 Environmental variables (global variables) #
Please note that the cloudflow associated with the Desktop Flow must be turned off and on when you change your environmental variables. Otherwise, the change in the variable will not take effect. In the example, these are used as input variables, but they can be used for other functionality than just Desktop Flows.
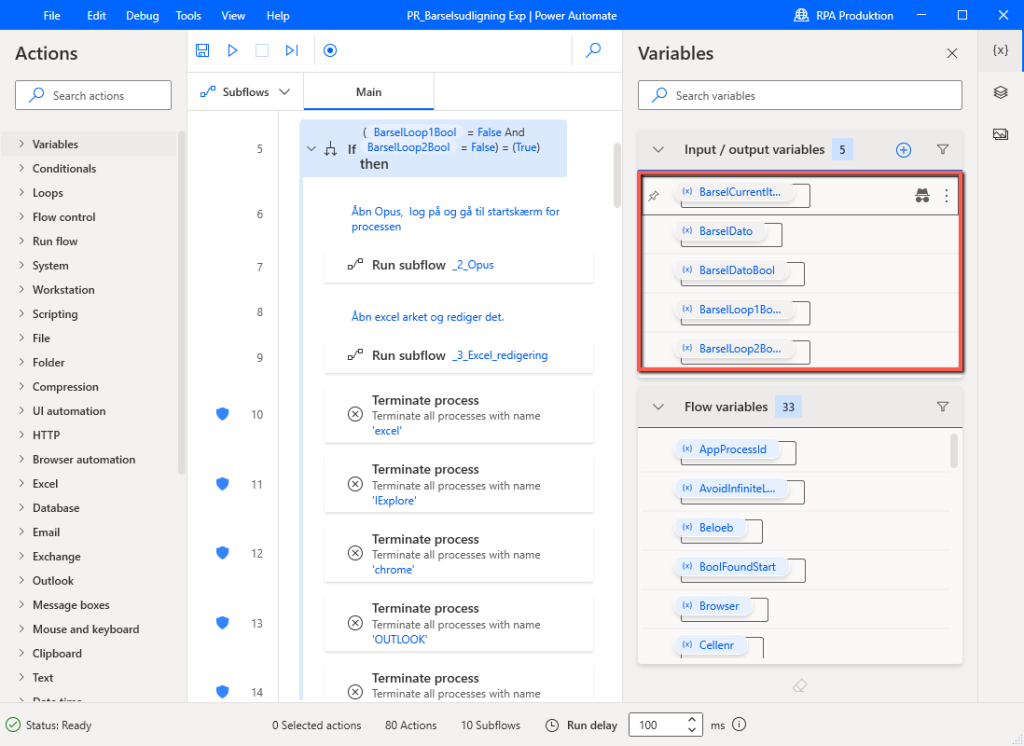
In the desktop flow itself, you create input variables, as shown below.
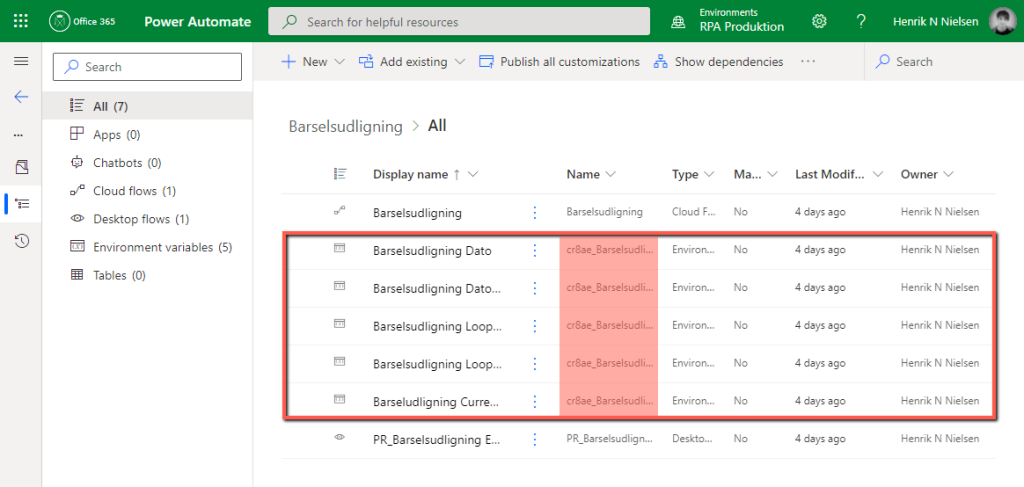
In the process’s solution , we insert new environmental variables , it is important here that the data type is set to Text .
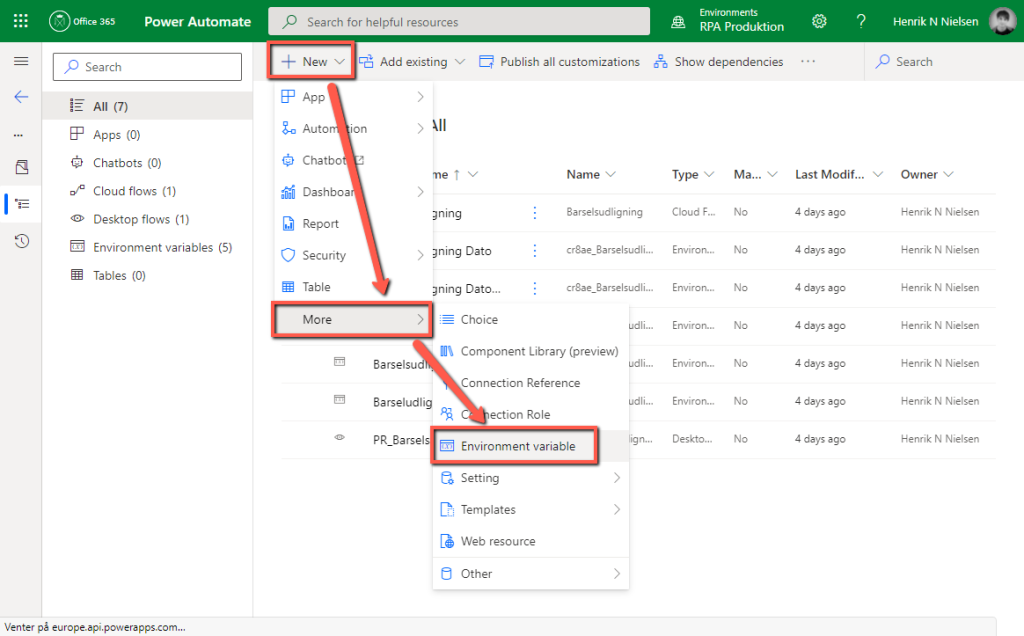
The different values can be manually set from here onwards.
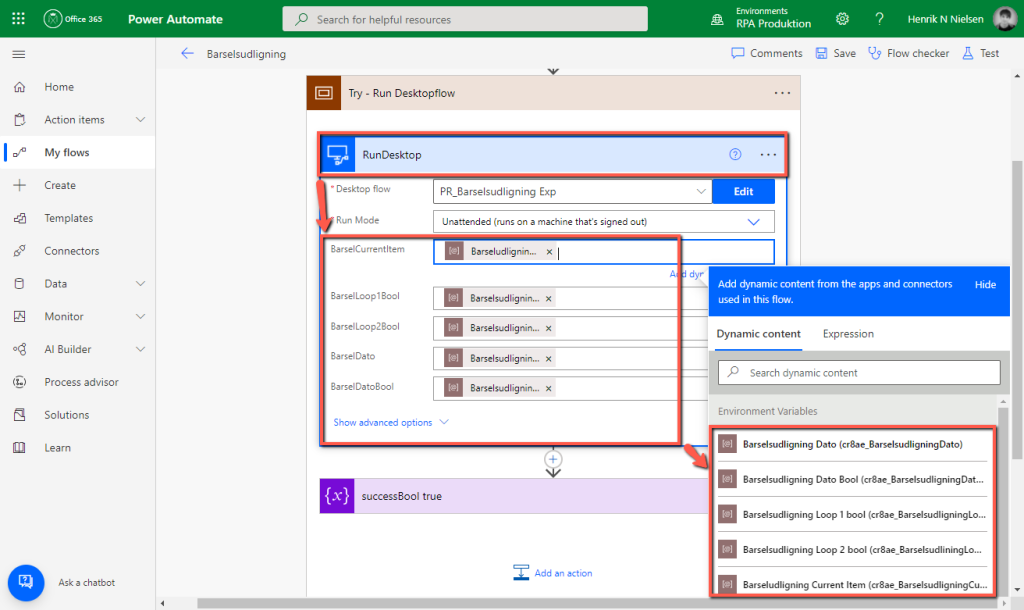
In the process’s cloud flow under the RunDesktop function, all the input variables we created earlier are visible, and in these we can refer their values to the environmental variables we created for the purpose.
4.2 Teams – Output variables from Desktop Flow for use in Cloud Flow #
If you need output variables in your Desktop Flow, for example for debugging, you can create an expression to retrieve these in various actions in your Cloud Flow . As shown below, this will automatically be displayed in some action fields.

In most cases, however, you cannot display it in a body, such as the Message sub-section in the standing Post message in a chat or channel . For this, we can however create an expression that retrieves the variable for us. Please note that variables marked sensitive can be used, as it only hides the variable content from the Power log, it can however be inserted into an Outlook or Teams message as shown below.
Marked in purple is the name of RunDesktop itself. Marked in red is the external name of the output variable in the Desktop Flow .
outputs(‘ Run_Desktop_Flow_-_Test ‘)?[‘body/ TestOutput ‘]


The finished product will look like this.


Please note that if you open the flow later, it will have automatically changed its icon to a desktop flow . This has no immediate effect and will continue to work as expected.

The message in Teams will look like this, the sender depends on which connection is associated with the Teams step in the cloud flow :

The finished product will look like this.


Please note that if you open the flow later, it will have automatically changed its icon to a desktop flow . This has no immediate effect and will continue to work as expected.

The message in Teams will look like this, the sender depends on which connection is associated with the Teams step in the cloud flow :


