1. Selectors #
Opus is pretty straightforward in terms of creating controls, the only thing you need to watch out for is when you get a new/removed entry, as the navigation bar doesn’t add the new entry to the right. There is apparently a fixed order in the background that pushes back and forth depending on what is added or removed.
1.1 Title #
In most controls, a Title has been added that you must activate yourself, this makes it much easier to create controls.


1.2 jQuery #
You can use jQuery such as an a:contains(“My Finance”) custom control that can directly capture the tab you want.

For setups like this, you can create a custom selector that tries to grab the tablerow with a contains:, and grab the title selector instead of id . Note in the example we are trying to pull out the Posting Date . Be aware that Opus Role-Based Entry is updated continuously, and the text itself can move to sit on another element. You may therefore have to try your hand at finding out where the text might be located.


2. Invoicing template #
2.1 Power Automate code #
Whereas you can also do invoicing through SAP, in some cases it can be easier and faster through Opus. Below we will go over how you can possibly create a template that can be copied every time you need to create a new process for invoicing. The invoicing itself is divided into 5 steps, which you fill in continuously. Most text fields and buttons get auto-generated IDs, which can be difficult to capture. Therefore, a combination of selectors, send keys and find image is used.
This requires access to the Invoice search and invoicing tab, where you can search for CPR / CVR numbers and create invoices.

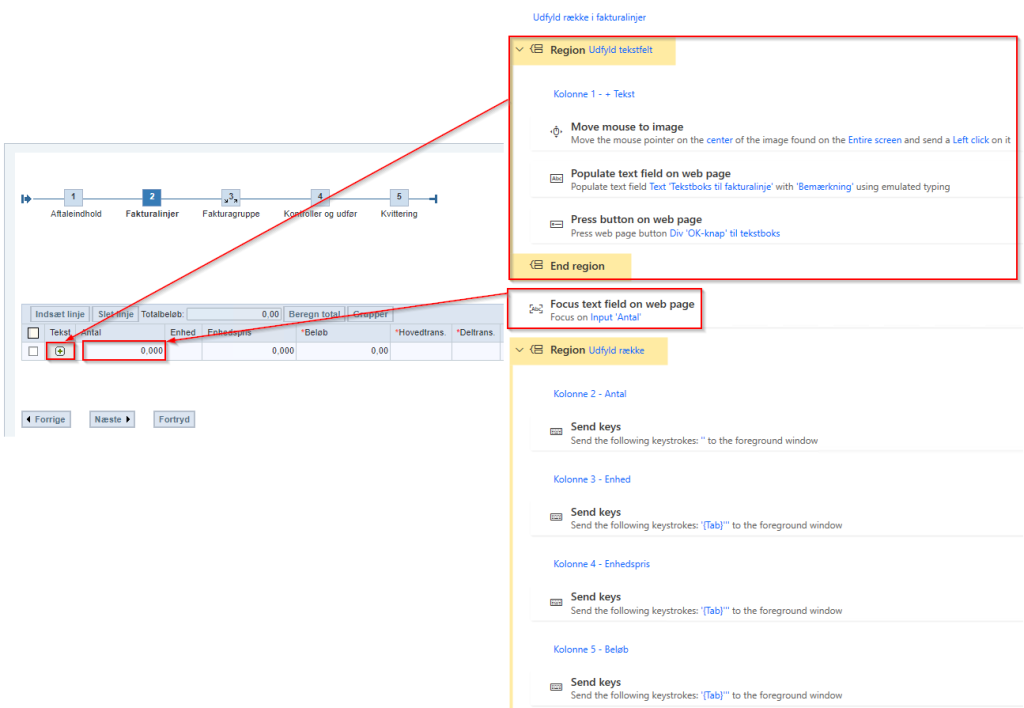
Below is an example from step 1. There are no variables inserted in the image in Send keys , as it is from an internal template that you copy and fill in yourself. However, there must be a variable next to “” in the individual Send Keys if they are to be filled in and not just skipped.
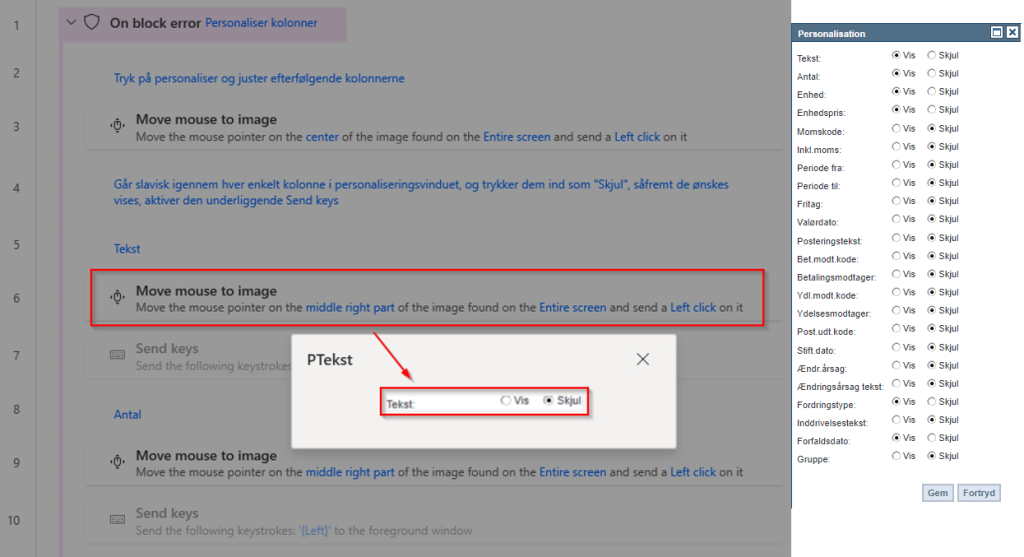
In part 2, you should pay special attention to the fact that columns can be added/removed via the Personalize button, and are valid until they are changed again. I have not had any success with this either with selectors ( changing IDs ), jQuery ( could not be found ) or send keys ( you cannot navigate between lines via, for example, Tab ). If you use Move mouse to image with the default tolerance of 10, and capture the images as shown, you can get it to work. The only downside is that you cannot validate whether you show or hide the columns, as you simply send a click. The best solution would be a standard user who has the columns that are most often used turned on. This has no effect on the appearance of the invoice; if a field is not filled in, it will not be displayed later.
When filling out part 2, image recognition is used to fill in the Text column. The rest is straightforward, starting from the Number column you can create Send keys and fill in the rest. The next steps will be the same procedure.
Selector for the number column (if this doesn’t work as expected, run a macro recorder and pull out a new one that way ) :
“html > bodysuit > table > tbody > tr:eq(1) > td:eq(1) > table > tbody > tr:eq(2) > td > table > tbody > tree > td:eq(1) > table > tbody > tr:eq(1) > td > different > iframe > html > bodysuit > div:eq(2) > table > tbody > tree > td > table > tbody > tree > td > iframe > html > bodysuit > table > tbody > tree > td > different > div:eq(0) > span > span > different > different > table > tbody > tr:eq(6) > td > different > different > table > tbody > tr:eq(0) > td > table > tbody > tree > td > table > tbody > tr:eq(1) > td:eq(2) > table > tbody > tree > td > input”

2.2 Documentation for process owners #
You can use blank images of the process as below, which can be sent to the process owner for completion with what to enter where. This can later be used as documentation of the process, and give the developer a quick overview.
Search for

Part 1 Agreement content

Part 2 Invoice lines

Column options:

Part 3 Invoice group

3. Reposting document #
It is also obvious to help with reposting documents , as RPA can quickly run through documents and business systems, and fill out a CSV file that can be handed over to the process owner afterwards, who can upload it directly to Opus. The template for the CSV file can be downloaded from Document processing – Create reposting document – Load from spreadsheet – Download template . Please note that not all columns need to be filled in, as it is an overall template, and that different views can use it anyway.

Since it can be a hassle depending on the RPA software and different solutions to write to a CSV, you can alternatively create the template yourself via VBScript as below. It only requires that Excel is already running, and has a workbook and sheet open. You can adjust the names of these if necessary. Please note that %CountCSVRow% is a self-made variable in Power Automate Desktop , which helps to find out what the next free row is in the CSV sheet, as I use the same code to later insert the values into the respective columns ( not all need to be filled in, you can leave them empty with “”) . You can then upload the CSV file to Opus in the same place where you can download the template, and depending on which view you choose, it will automatically fill the columns with the entered values.
3.1 VBScripts for CSV attachments #
Creation with column names in row 1:
Set objExcel = GetObject(, “Excel.Application”)
Set objWorkbook = objExcel.Workbooks(“Folder1”)
Set objSheet = objWorkbook.Sheets(“Sheet1”)
objExcel.visible=true
objSheet.Cells( %CountCSVRow% , 1).Value = “Type account”
objSheet.Cells( %CountCSVRow% , 2).Value = “Cost Center”
objSheet.Cells( %CountCSVRow% , 3).Value = “PSP Element”
objSheet.Cells( %CountCSVRow% , 4).Value = “Profit Center”
objSheet.Cells( %CountCSVRow% , 5).Value = “Order”
objSheet.Cells( %CountCSVRow% , 6).Value = “Debit/Credit”
objSheet.Cells( %CountCSVRow% , 7).Value = “Amount”
objSheet.Cells( %CountCSVRow% , 8).Value = “Next agent”
objSheet.Cells( %CountCSVRow% , 9).Value = “Text”
objSheet.Cells( %CountCSVRow% , 10).Value = “Payment Type”
objSheet.Cells( %CountCSVRow% , 11).Value = “Assessment year”
objSheet.Cells( %CountCSVRow% , 12).Value = “Payee number.”
objSheet.Cells( %CountCSVRow% , 13).Value = “Payee no.code”
objSheet.Cells( %CountCSVRow% , 14).Value = “Beneficiary no.”
objSheet.Cells( %CountCSVRow% , 15).Value = “Beneficiary no.code”
objSheet.Cells( %CountCSVRow% , 16).Value = “Period of service from”
objSheet.Cells( %CountCSVRow% , 17).Value = “Period of service to”
objSheet.Cells( %CountCSVRow% , 18).Value = “Information obligation no.”
objSheet.Cells( %CountCSVRow% , 19).Value = “Information obligation recipient no. code”
objSheet.Cells( %CountCSVRow% , 20).Value = “Disclosure code”
objSheet.Cells( %CountCSVRow% , 21).Value = “Network”
objSheet.Cells( %CountCSVRow% , 22).Value = “Operation”
objSheet.Cells( %CountCSVRow% , 23).Value = “Quantity”
objSheet.Cells( %CountCSVRow% , 24).Value = “Unit of Quantity”
objSheet.Cells( %CountCSVRow% , 25 ).Value = “Reference Key”
objSheet.Cells( %CountCSVRow% , 26).Value = “Org. no.”
objSheet.Cells( %CountCSVRow% , 27).Value = “Next EAN no.”
Filling in data later
Set objExcel = GetObject(, “Excel.Application”)
Set objWorkbook = objExcel.Workbooks(“Folder1”)
Set objSheet = objWorkbook.Sheets(“Sheet1”)
objExcel.visible=true
objSheet.Cells( %CountCSVRow% , 1).Value = ” %VarArtsKonto% “
objSheet.Cells( %CountCSVRow% , 2).Value = ” %VarOmkostningssted% “
objSheet.Cells( %CountCSVRow% , 3).Value = ” %VarPSPElement% “
objSheet.Cells( %CountCSVRow% , 4).Value = “”
objSheet.Cells( %CountCSVRow% , 5).Value = “”
objSheet.Cells( %CountCSVRow% , 6).Value = ” %VarDebKred% “
objSheet.Cells( %CountCSVRow% , 7).Value = ” %VarBelob% “
objSheet.Cells( %CountCSVRow% , 8 ).Value = “”
objSheet.Cells( %CountCSVRow% , 9).Value = ” %VarBanktekst% “
objSheet.Cells( %CountCSVRow% , 10).Value = “”
objSheet.Cells( %CountCSVRow% , 11).Value = “”
objSheet.Cells( %CountCSVRow% , 12).Value = “”
objSheet.Cells( %CountCSVRow% , 13).Value = “”
objSheet.Cells( %CountCSVRow% , 14).Value = ” %VarCPR% .”
objSheet.Cells( %CountCSVRow% , 15).Value = “02”
objSheet.Cells( %CountCSVRow% , 16).Value = “”
objSheet.Cells( %CountCSVRow% , 17).Value = “”
objSheet.Cells( %CountCSVRow% , 18).Value = “”
objSheet.Cells( %CountCSVRow% , 19).Value = “”
objSheet.Cells( %CountCSVRow% , 20 ).Value = “”
objSheet.Cells( %CountCSVRow% , 21 ).Value = “”
objSheet.Cells( %CountCSVRow% , 22 ).Value = “”
objSheet.Cells( %CountCSVRow% , 23).Value = “”
objSheet.Cells( %CountCSVRow% , 24).Value = “”
objSheet.Cells( %CountCSVRow% , 25 ).Value = “”
objSheet.Cells( %CountCSVRow% , 26 ).Value = “”
objSheet.Cells( %CountCSVRow% , 27 ).Value = “”
Save the CSV file as semicolon-delimited, and close the workbook and Excel.
Dim objExcel, objWorkbook
Set objExcel = GetObject(, “Excel.Application”)
Set objWorkbook = objExcel.Workbooks(“Folder1”)
objExcel.visible=true
objWorkbook.SaveAs ” %FilePathCSV% “, 6, , , , , , , , , , True
objWorkbook.Close False
objExcel.Quit
4. Journal entry #
4.1 Attachment inbox part #
In order to be able to do Document Posting in Opus, you must have access to the EAN(s) in question. You can then view the documents that are ready for approval for the EAN under the My Finances – Documents and Invoices – Document Inbox tab.

In Power Automate Desktop you can set up a loop by extracting the entire table (Extract data from webpage- action) , and doing a for-each on each row. Please note that in the extract you select a cell in the table first, and do a Select parent UI element a number of times (it also takes time before it catches them each time ) until it selects the entire table as shown below, and then an Extract entire HTML table as shown. Since there are tables in the table, you cannot directly select Extract entire HTML table on the first cell you select, as it will only retrieve the value of one cell.
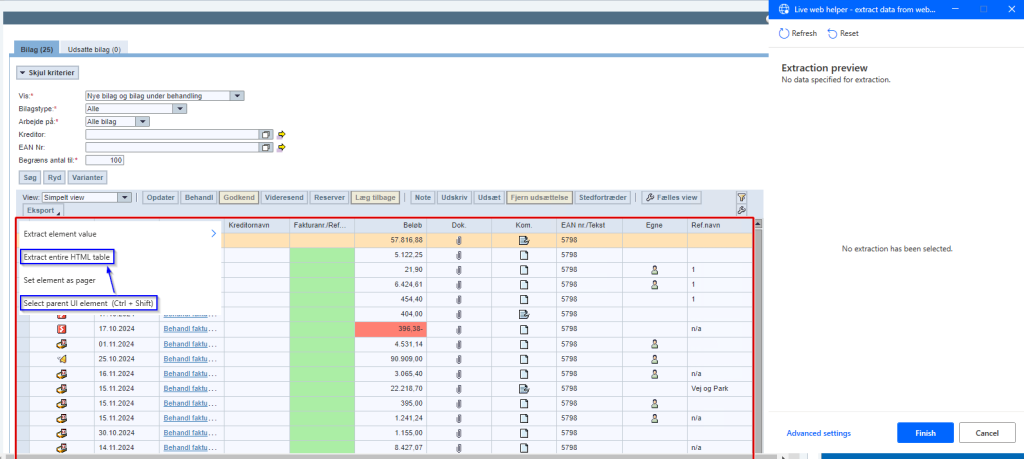
The table itself only shows 20 rows at a time, and these will also be the only ones a robot can extract. If there are less than 20 rows with data, the last rows will be blank. If you want to extract more, it requires, for example, a pagedown in the table and a new extract. My solution is to keep extracting the first and last rows, and at the end of each run save them, and then match them against each other before the invoice loop ( the “real” loop for the process ) is run. If they match, it can be assumed that the same data is being looked at, and that there is nothing more to do.
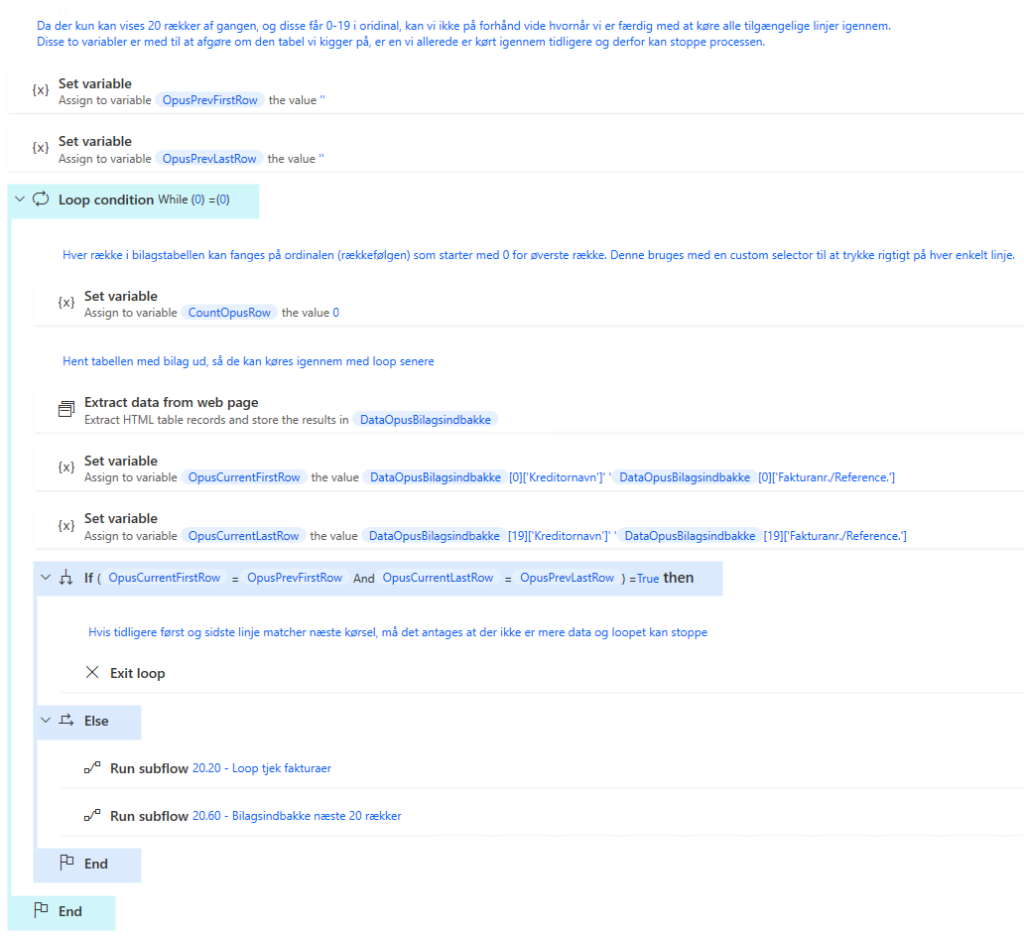
20.60 looks like this, and jumps down the table to the next data set. Since the Process invoice / credit note link is the only one in the table that has a fixed text that you can capture, this is used both to open invoices in the next part, and in this case to mark the table so that you can do a pagedown . In this action, however, X is offset by 40, so we only click on the right side of the cell and not on the link itself. The selector looks like this:
iframe[Id= contentareaframe=””] iframe[Id= ivufrm_page0ivu0=””] span[Text= behandl=”” faktura / kreditnota”] :eq( %CountOpusRow% )

4.2 Invoice part #
Depending on your needs, you can either have the robot fill in lines and then approve or just save so that a finance employee can double-check before approving a voucher. It is also possible that you have an amount limit in mind for both scenarios, so it can change depending on this. You can also try to enter something in the Buyer’s order number: field that the robot can look up and find. place or PSP element from to the completion.
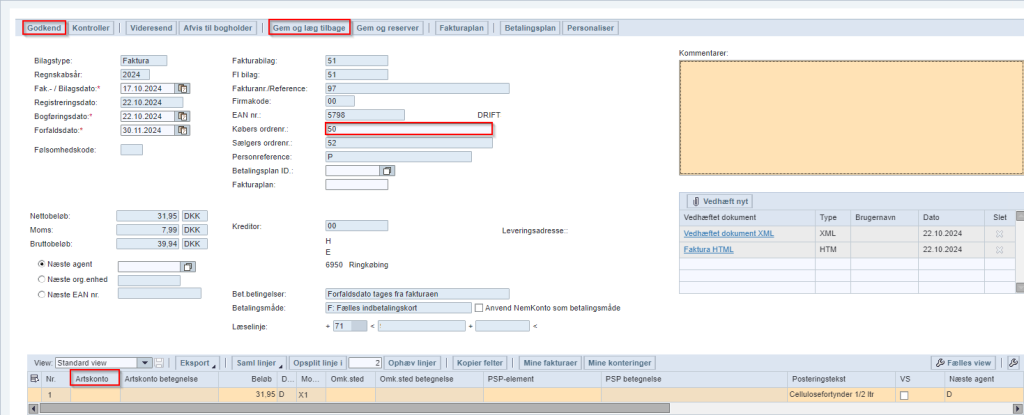
To create selectors for the buttons, and possibly the General Ledger Account column, you can turn off the Id ( they change every time a new document is opened ) and capture them on their Title instead, as these are fixed.

For the filling, you can do something similar, where we pull out all the rows in the appendix, the same procedure as before. Then you can get a RowsCount , so the robot knows how many lines it needs to fill in. I haven’t been able to make a selector with an ordinal to capture the individual fields, so instead Send Keys are used as shown below.
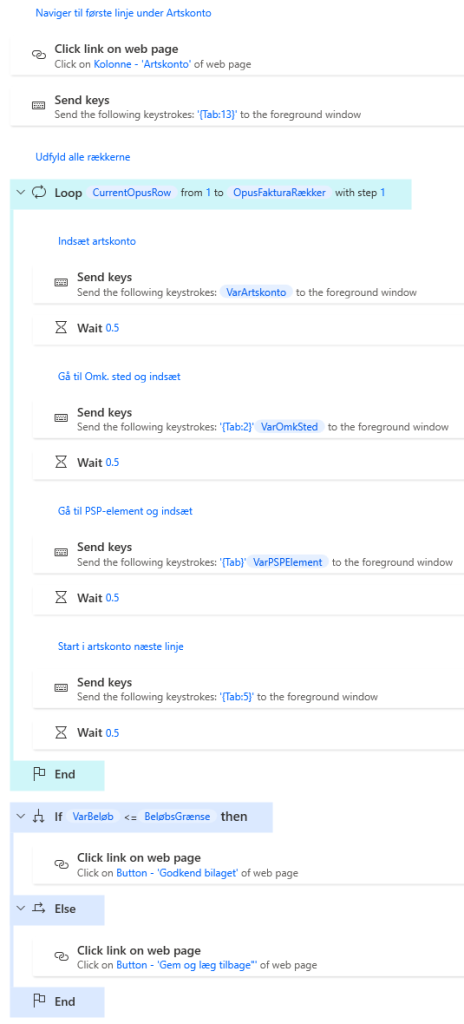
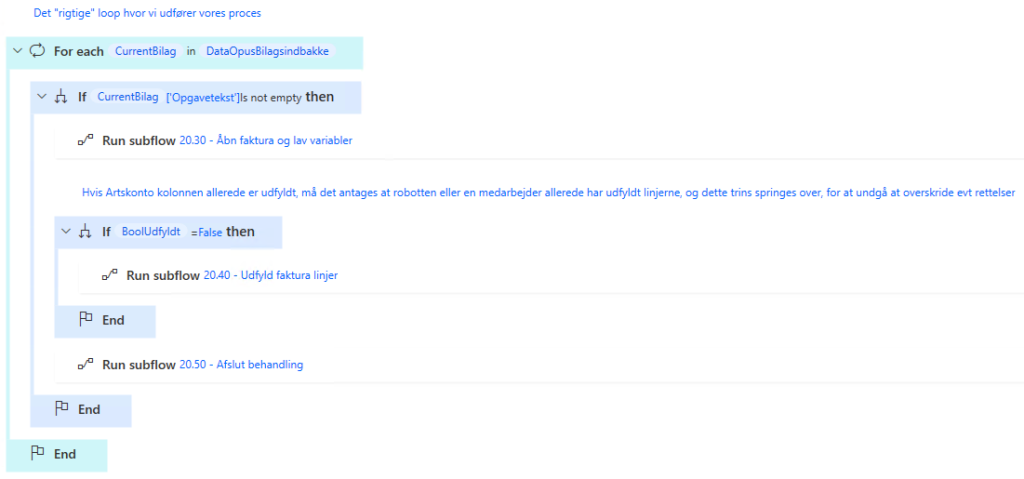
The loop subflow looks like this.
