1. Introduction #
API access to KMD Nexus is an additional product that requires some technical setup. Furthermore, KMD has previously required that you receive training in using the API before you can gain access. Furthermore, it is almost impossible to test in its Nexus test environment, as this is not a true representation of how things look in the live version. So if you want to use the API for this, you must be able to test in the live environment. For this, you can possibly create a few fictitious patients that you can test with. The instructions below do not deal with that part, and assume that all these things are already in place. At the same time, this is made from the point of view of an RPA developer. There is therefore not much help to be found in relation to creating views and any other things that require Nexus administrator access.
Please note that some Powershell script extracts below have had their IDs changed due to GDPR. Additionally, powershell script extracts may be missing some values , typically under the _links section. This is done to increase readability, however, there will typically be many more than shown in the extracts.
Since our scripts are made as dynamic as possible, other municipalities should be able to use these as well. These can be provided upon request, however, we disclaim responsibility for the use of these, and any maintenance that may be required. Therefore, it will be important to familiarize yourself with how they work, in order to be able to use and maintain them yourself. Please contact henrik.nielsen@rksk.dk for further information.
1.1 How is Nexus assembled? #
To get an understanding of how Nexus works, you can think of Nexus as a large relational database. Data is organized in many different tables, where there can be many relationships between these. Much of what can be seen in the UI is views with specifically filtered data, which can be created by a Nexus administrator. In other words, there is not necessarily anything fixed. If you have worked with data extraction ( sql for example ), and Power BI or similar programs to display data, it is very similar to such a workflow. Unlike a SQL database for example, all functionality on Nexus is built with links and API calls ( POST, PUT, GET, DELETE ). The latter is reviewed in section 2. RPA development API .
A concrete example is shown below, where we have called up an object with the API, which in this case is a process. Overall, this has a type, and it can be things such as documents, letters, organizations, processes, etc. At the same time, we have an ID that refers specifically to the patient’s process, and one to a template, for lack of a better word, which this is made from. That is, a patient can have many of the same processes , where the programPathwayId will be 111555 for all but where the patientPathwayId is unique for each of these. Furthermore, these can have subprocesses, letters, documents, and other things associated with them, which you can see in a view.

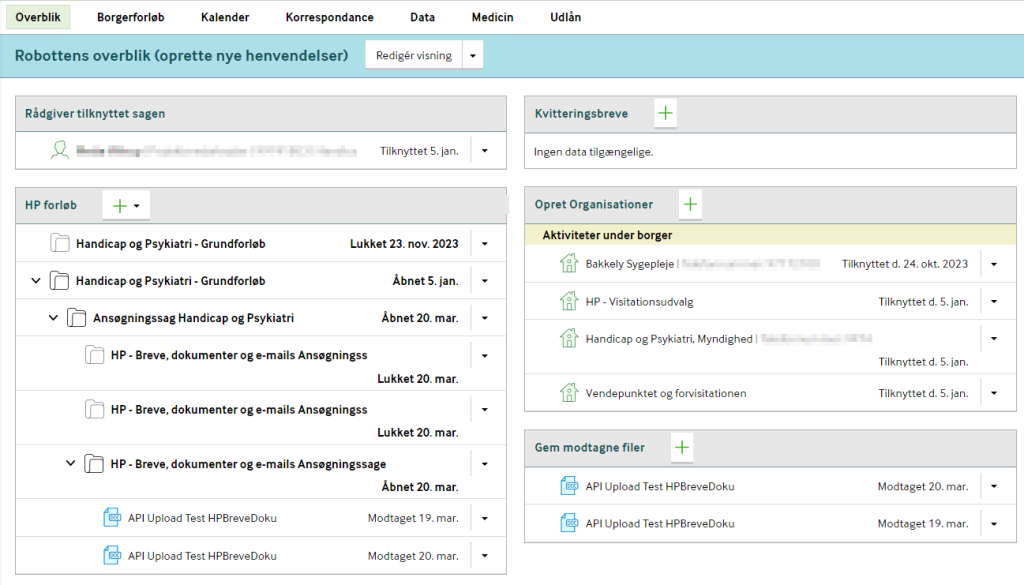
A view might look like this, where each widget (box of content) contains filtered data that a Nexus administrator has created. These can display or filter data as needed, and are an easy way for the robot to pull data. This is discussed further in section 2.2. Eksempel på arbejdsgang .
If, as another example, you want to upload a document, this process can be started directly from the patient object, widget or possibly from a process. Note that the prototype ( template ) and placement change, depending on where the upload starts from. For example, if we start the upload from a process, the document will automatically be associated with it. If, on the other hand, we do it on the patient, the document will generally just belong to it. You can also start the upload from the different places and choose where the document should be saved. However, it is less complicated to navigate to where the document should be located and call the link from here.
$patient._links.documentPrototype.href – /api/document-microservice/rksk/documents/ prototype ? patientId=24325 & placement=PATIENT
$widget.creatableObjects._links.documentPrototype.href – /api/document-microservice/rksk/documents/ prototype/289671 ? patientId=24325 & placement=PATHWAY
$pathway._links.documentPrototype.href – /api/document-microservice/rksk/documents/ prototype/300367 ? patientId=24325 & placement=PATHWAY
Additionally, you can inspect network traffic to find out where some data on the page is coming from. Right-click on the page and select Inspect .

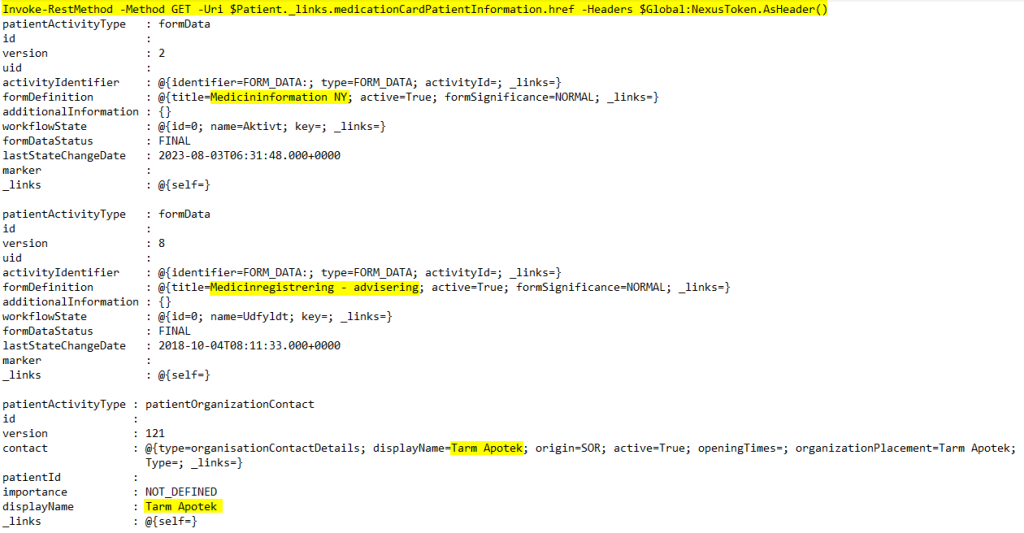
In the new window under Network , you can turn on Fetch/XHR so that you only see API calls. Then refresh the page, and look through the calls to match the data together. If you find what you are looking for, you can also hover your mouse over the object, as the link can give you an idea of where the data is located. In this case, it is located under the patient object, and a link called something like medicationCardInformation .

While the link is not named exactly the same, we can find one called medicationCardPatientInformation under patient._links . This pulls the same data as is in the view.
2. RPA Development API #
2.1 Introduction #
When developing Powershell Scripts to use the Nexus API, it is absolutely easiest to use Powershell ISE . Here we can write and test at the same time. Navigating through the API is very similar to clicking around the website. Instead of clicking on buttons/links, we use API calls. All objects in Nexus almost always have a ._links , where you can see where you can go if what you are looking for is not already on the object.
To be able to create scripts with the API, you need to use an authentication token, which can be retrieved directly from the browser after logging in to Nexus. This must be updated every 60 minutes to remain valid. In the case of scripts that have long execution times, an autorefresh method must be considered in these. It is a little more complicated to get acquainted with, but our reusable script takes its use into account.
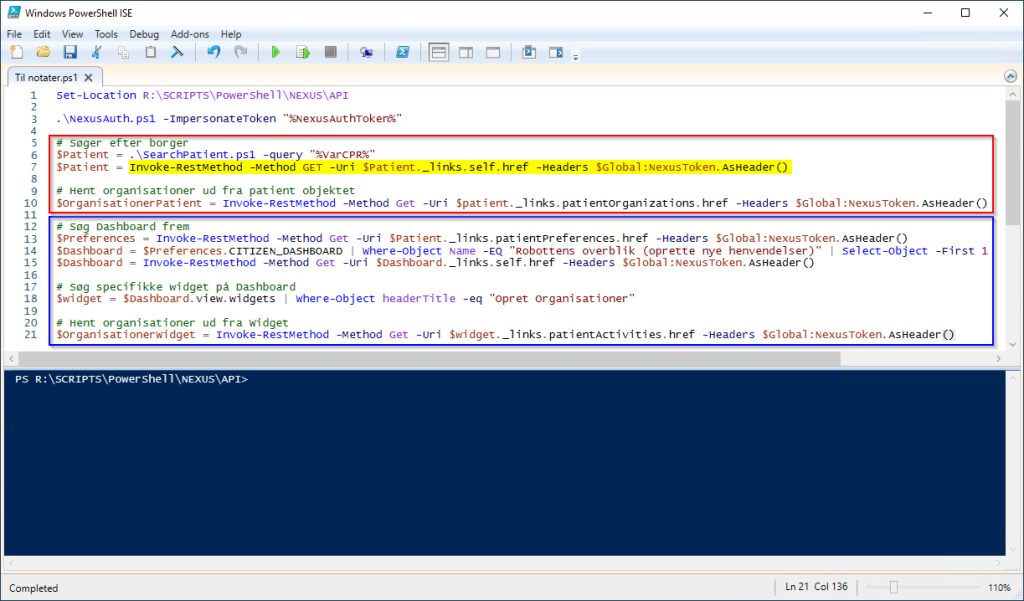
Below is an example of where you can retrieve the organizations that the patient is affiliated with. From the patient object itself, there is already a link to which you can retrieve all registered organizations as a list. We can open this with a RestMethod GET as shown in yellow, and navigation through the Nexus API will typically look like this. If this were not the case, it is conceivable that these could be found on a view, which could possibly be filtered specifically to the needs of the process (for example, only relevant organizations are displayed, and others are filtered out ) . From the patient object, we can find a Dashboard , also known as an Overview . First, we need to retrieve the list of all possible Overviews we can access, and then search for the specific one we are looking for. Furthermore, to be sure that the object is in the right state, we retrieve its self -reference. In this way, the $Dashboard variable is no longer just a search result, with the content that it now shows, but actually the dashboard in question and its dataset. In other words, there can be many ways to access the same data.
2.2 Example workflow – Upload a form #
The example here is based on filling out and uploading a form. On a display to the robot, we reach this Widget which has that functionality.

We must therefore open the Overview , find the Dashboard that has the widget we are missing, and then pull it out. There is a cheat below, as we have reusable scripts that can dynamically help us find these.

As an example, the script to find a widget looks like this. It is built with the parameters that should be used if you want to search for a widget . In addition, some error handling is built in that can give a clue as to what is causing a possible error.

Once we have found the widget we are looking for, the next step is to find out where the link to the prototype is located. A prototype is a template, in this case for a form, which has not been filled in. This must first be extracted, after which we can change it, and then submit it afterwards. These are typically located under a createableObjects , and as shown in the extract, we can already see that there is a form underneath.

In createableObjects we can see that there is a forms , which has the title of what we are looking for. We can then jump further down into forms and _links to find the full link to the prototype.

From here we can navigate all the way down to the final path, where the link to the prototype is located.
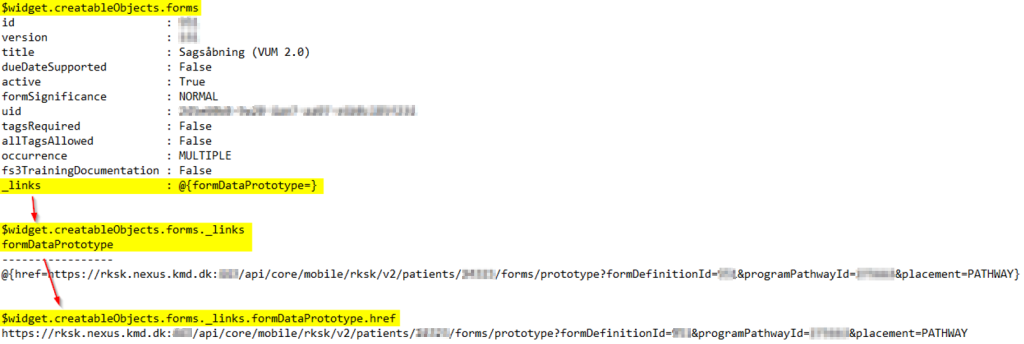
Now we can retrieve the prototype from earlier in the script and store it in a variable.

The prototype itself looks like this, we inherit a lot of data about the patient. The form itself with the fields is hidden under Items .
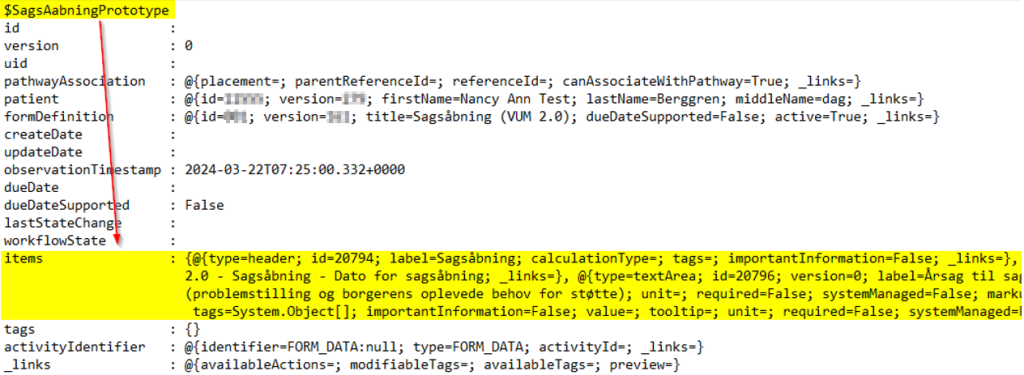
If we pull out our items , it’s relatively easy to figure out what’s what. Each one has a label and id that’s unique on the form, as well as a value field we can fill in with a string . Note that in the radio button part, we’re also fed possibleValues , where the entire object must be inserted into the value field.
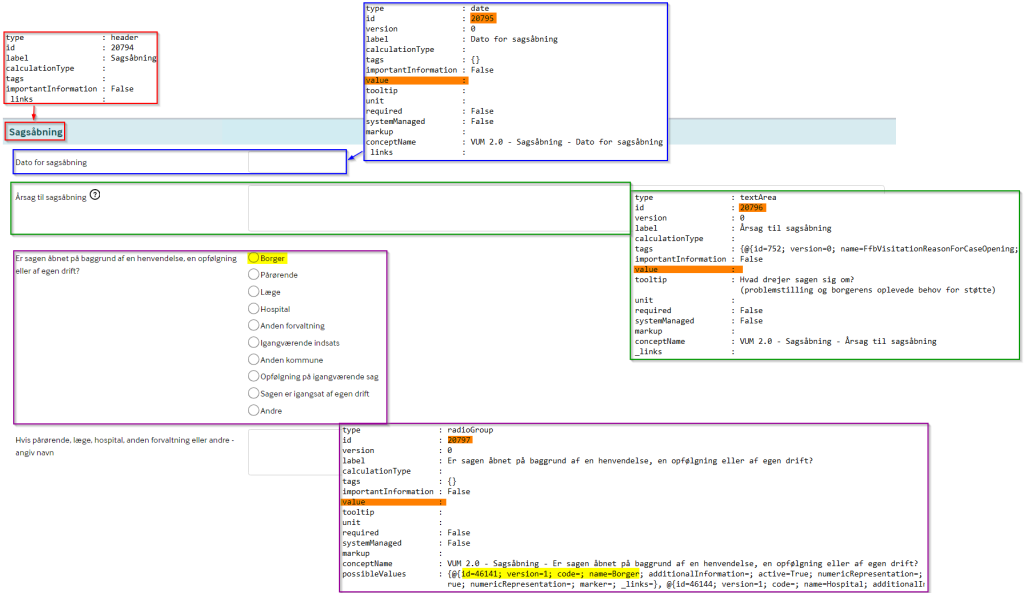
It can be an advantage to have a manually filled out example so that you can see how things look afterwards. Here we can compare between the prototype and an already filled out form. This can be done by retrieving the already filled out form from the same widget.

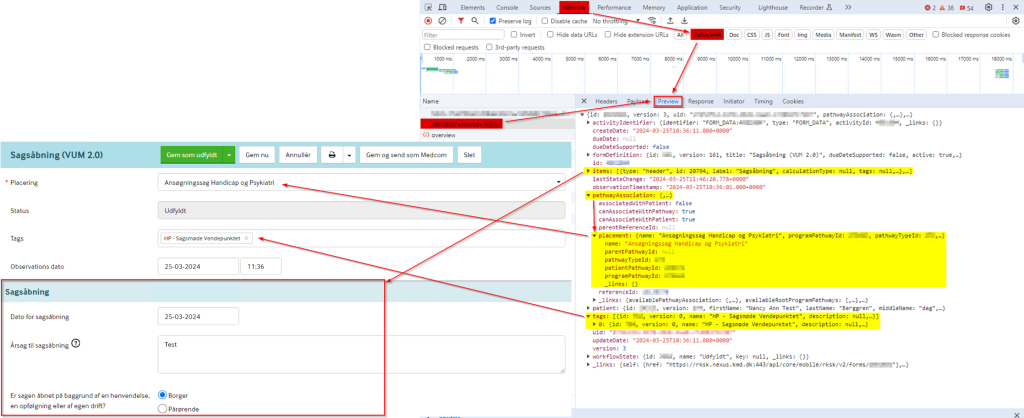
Alternatively, you can also download one directly from Nexus, either upon creation/after this. Right-click on the page and select Inspect .

In the new window under Network , you can turn on Fetch/XHR , so that you only see API calls. You can then create/update a form, and subsequently find the overview. Under preview you can see the content that was sent to Nexus. By comparison, we can see that items are everything that comes after the Case Opening (VUM 2.0) section, where all of these are collected in a large array. At the same time, we can see that Placement is under pathwayAssociation.placement . Furthermore, we can see that Tags is under tags , and that these are stored as an array.
Furthermore, under Headers we can see which method was used to make the call, as well as what the content type is. We will need both of these when we want to submit our prototype ourselves.
The image here should be a POST if we submitted a whole new form, but here we have only updated, which is why it says PUT .

Without going into too much detail, we will overwrite the values in our prototype that are required with our own inputs. Some inputs must be objects, objects in an array, strings or other more specific data. Marked in yellow are dates, for example, in yyyy-MM-dd format when they are sent in, even though they are displayed in the Nexus GUI as dd-MM-yyyy format. We can also send PAD variables with, for example, as marked under the date. This can be seen in the already filled in, with a .gettype() behind the individual parts. Finally, we can fill in the POST link, with the data we found earlier in the Headers during the inspection.
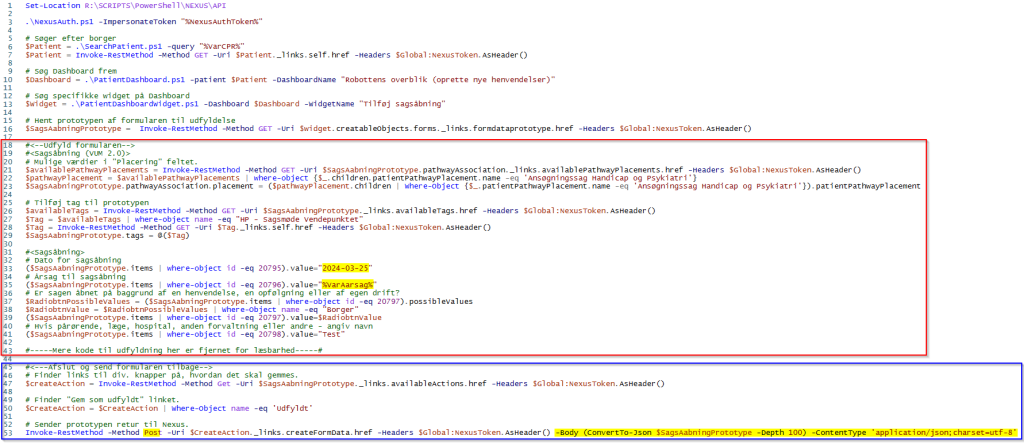
Example here with a gettype() on tags, which shows that it receives objects in an array.

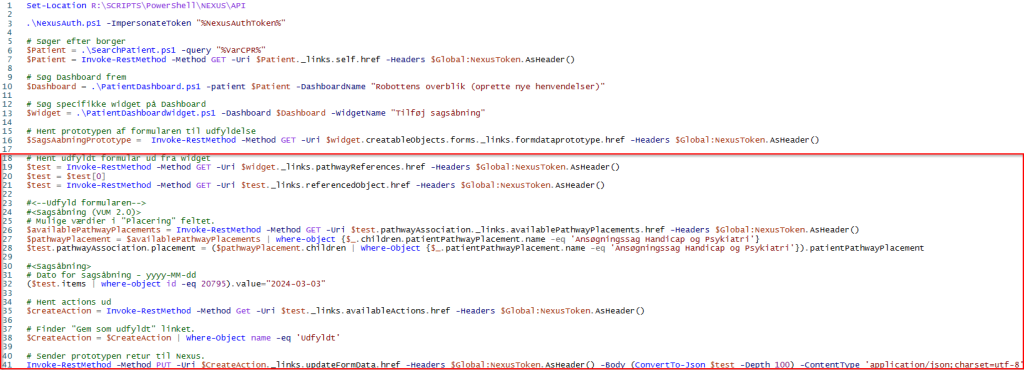
An easy way to test whether what you are submitting is in the correct format is to use the completed form. You overwrite the data in this, and send a PUT with the update link in, with parts of the data. If this is successful, it should also work with the link to POST.
3. Reference book #
3.1 Where to find what – visual reference on patient #
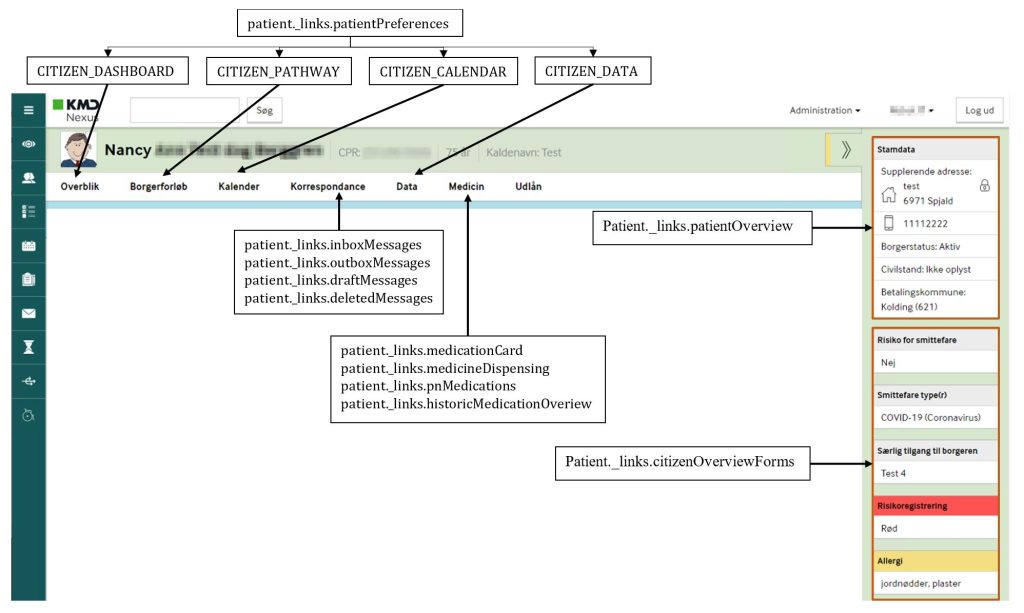
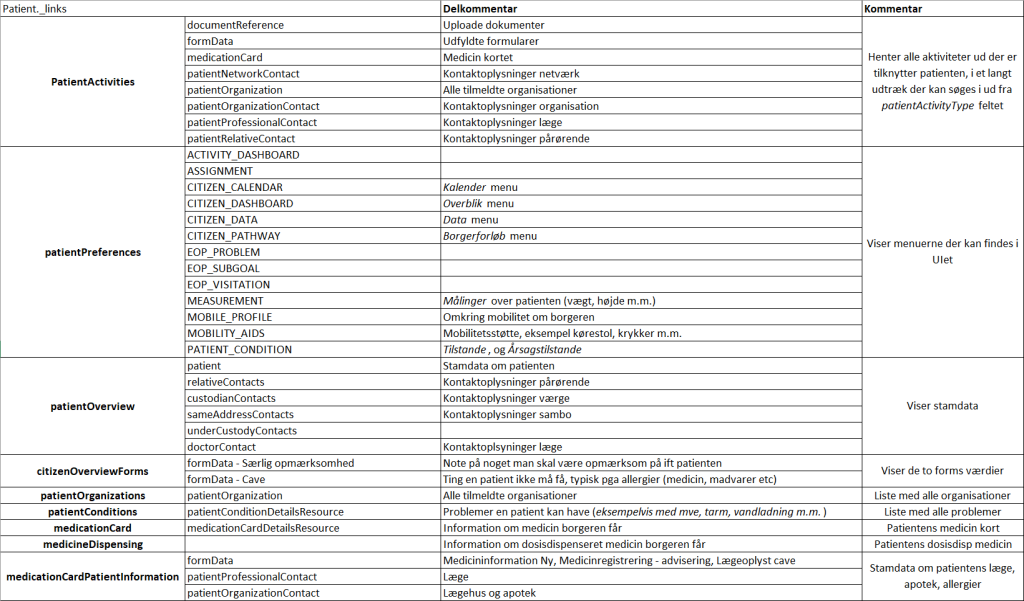
3.2 Patient object links – what is where? #
Furthermore, we do not look at prototypes , i.e. the actual creation link for various items. The table only shows what data the link or its sublink shows.
