1. Introduction #
The guide is based on KMD SAP , however much of this knowledge can be used in general for working with SAP applications.
Due to the number of shortcut keys, it is easiest to navigate around SAP via Send Key actions. However, it is possible to create controls that work.
| Name | Note | Link |
| SAP | General help | https://help.sap.com/docs/ |
| SAP | Language codes | https://help.sap.com/docs/translation-hub/sap-translation-hub/supported-language-codes |
2. Points to note when working in SAP #
2.1 Layout registration keys #
Whereas you can work with CPR , it is best to work with employee number . This system behind, chooses a random employee number if a CPR returns more. Furthermore, it is required that files for the personnel folder, for example, actually lie on the position that the documents concern. It is rare that employees have more than one, however it is not uncommon as SOSU, for example.
It can be an advantage to run a powershell script in each run that sets all registry keys so that it is always the same for the robots. Furthermore, it turns out that SAP must use Windows windows when selecting files for upload. This is because SAP otherwise chooses 50/50 between its native and Windows windows for this purpose, which is impossible to code around otherwise. When SAP is updated, it typically resets these settings, which otherwise have to be manually set up again for each robot, if you do not run the script.
“# Sets SAP settings in the registration database (Scripting).
REG ADD ‘HKCU\SOFTWARE\SAP\SAPGUI Front\SAP Frontend Server\Security’ /f /v UserScripting /t REG_DWORD /d 1 | Out-Null
REG ADD ‘HKCU\SOFTWARE\SAP\SAPGUI Front\SAP Frontend Server\Security’ /f /v WarnOnAttach /t REG_DWORD /d 0 | Out-Null
REG ADD ‘HKCU\SOFTWARE\SAP\SAPGUI Front\SAP Frontend Server\Security’ /f /v WarnOnConnection /t REG_DWORD /d 0 | Out-Null
REG ADD ‘HKCU\SOFTWARE\SAP\SAPGUI Front\SAP Frontend Server\Scripting’ /f /v ShowNativeWinDlgs /t REG_DWORD /d 1 | Out-Null
REG ADD ‘HKCU\SOFTWARE\SAP\General\Appearance’ /f /v SelectedTheme /t REG_DWORD /d 1 | Out-Null
REG ADD ‘HKCU\SOFTWARE\SAP\General\Appearance’ /f /v SelectedFallbackTheme /t REG_DWORD /d 1 | Out-Null
REG ADD ‘HKCU\SOFTWARE\SAP\General\Appearance’ /f /v CorbuIcon /t REG_DWORD /d 1 | Out-Null”
Almost everything is enabled in selectors as a starting point. However, you can disable most of them and use the last one with a long ID. It inherits the entire path, and therefore there is no need for the intermediate links. The first one is the last element in the row, which inherits a lot from the previous ones. The last two elements are the unique identifier of the button we are actually looking for.

2.2 Send keys navigation #
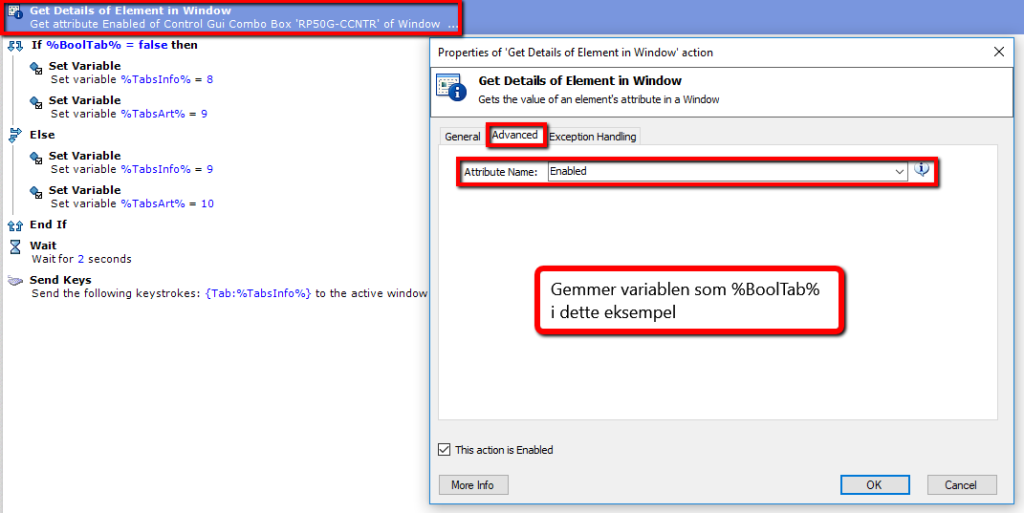
If you use Send Keys , you should be aware that some controls on the page can switch between Enabled and Disabled , which can for example change the amount of Tabulator presses you may need to use. A solution to this is to use a Get Details of Element in Window , and under Advanced , check Enabled . This gives a variable with true and false , which you can then build an if-statement with.


2.3 Settings so the robot can run #
To use RPA in SAP, these settings must be set as a minimum, see 1.1. for a powershell script that does the same:


2.4 Switch to employee number search #
Please note that you can still search for CPR after the change by typing = in front of a CPR in the search field, even if SAP stands for employee number. For example =0101011122. The first time you use this functionality, you must select a filter. See the bottom of the guide for further information.
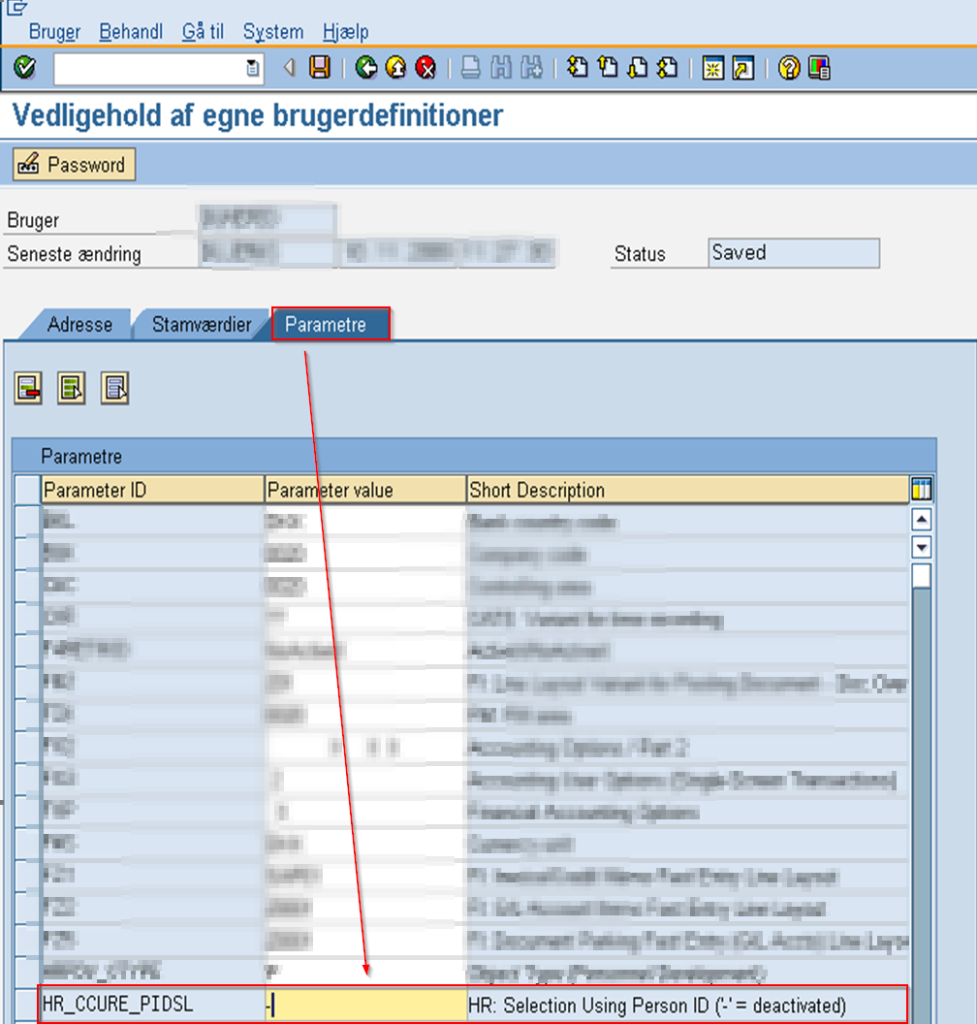
Navigate to System – User definitions – Own data

Under Parameters find HR_CCURE_PIDSL type – and then press F11 to close the window.

The first time you use this functionality, you will be asked to limit the value range via a popup. You can choose different views, an example is Person-ID, where you can see the person’s employee number and name. Select the tab at the top, enter any CPR and press the check mark.

Search will show this in the future when you put =

3. Upload files to the Personnel Folder Template #
It is possible to create a dynamic template for uploading files to the staff folder. Here you can create your standard code, debugging etc. Most of the code for the purpose is 100% the same every time, perhaps except where you get the data from. It will be in the staff folder that you need to create two dynamic selectors that select the folder and the menu item. These can be different, depending on what needs to be uploaded. Be aware that it takes a long time ( up to 30 seconds ) for a robot to click on these two for inexplicable reasons.

Selector for folder as of June 2024 (Absence/presence in the picture):
Tree[Id= wnd=””] /usr/cntlCLFRM_CONTAINER/shellcont/shell/shellcont[0]/shell/shellcont/shell/shellcont[2]/shell/shellcont[1]/shell”] TreeItem[Name=” %SAPMappe% “]
Selector for sub-item (Vacation/other absence in the picture ):
Tree[Id= wnd=””] /usr/cntlCLFRM_CONTAINER/shellcont/shell/shellcont[0]/shell/shellcont/shell/shellcont[2]/shell/shellcont[1]/shell”] TreeItem[Name=]> TreeItem[Name=” %SAPMappePunkt% “]
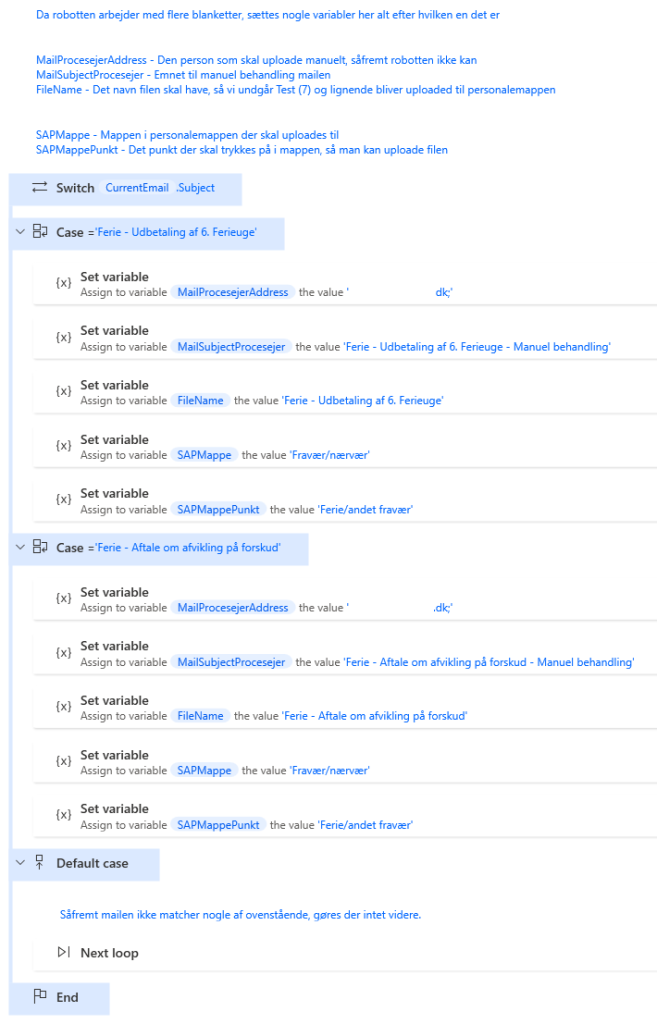
From the code where extra cases can be added.

From my documentation of the code:
The code is divided into the following subflows:
Main : This is the main function that orchestrates the entire process. From here, other functions are called in sequence to handle different parts of the workflow.
00.10 Initialize : Prepares the environment by setting up necessary variables, directories, and logging details. This includes variables for debugging and logging to SQL, which must be overridden for new use.
99.99 Exit : Handles the cleanup and logging at the end of the process, including sending error reports if necessary.
Global Error Handler : Provides a mechanism to catch and log errors that occur during the execution of the automation that would stop the process from running completely. This ensures that any issues are detected and an error message is sent to the developer.
10.10 – Retrieve mail : Set up to retrieve all mail and attachments from< mailbox> which comes from XFlow.
10.20 – Log in to SAP : Logs in to SAP and opens the PA30 menu.
20.10 – Loop : Runs each subflow below in sequence.
20.20 – Which form : Based on a Switch, cases have been set up for each form about what needs to be done. Here, the variables are filled in as they fit, as these are the only things that change in the process. In addition, there is a default case that jumps to the next email if it does not hit the predefined ones.
20.30 – Create variables from data : By default, the CPR is retrieved from the XFlow form, and is subsequently used to look up employee numbers/dates in the Salary table. If there are multiple employee numbers, an email is sent to the process owner for manual processing.
20.40 – Upload file to personnel folder : Uploads the file to the selected personnel folder. Possibly writes to the process owner about manual processing if the person it is looking up has been deleted.
20.50 – End processing : Moves the email to the given path in the Processed mailbox.


