1. Introduction #
XFlow is web-based software used to create digital forms and workflows for them. The software is constantly evolving, and new features are added regularly. XFlow has an excellent support page where you can find documentation and instructions for almost everything. For this reason, things will not be described in depth in this guide. However, there will be a quick overview of the main things, and a few tips and tricks to utilize some functionality.
The quick overview:
- Form templates – Created via a form, where there is a good collection of elements for this.
- Workflow templates – Create a flow that controls how templates are used. This can include data submissions and approval steps as part of the flow.
- API access
- Integrations to other software including – Acadre, SBSYS, Navision, Prisme, Pensopay etc.
- Possibility of payment by filling out the form via Pensopay
| Name | Note | Link |
| XFlow | XFlow main page | https://xflow.dk/ |
| XFlow Support | Release notes, manuals, experience material, webinars, etc. | https://support.xflow.dk/ |
| Pensopay | Xflow has an integration with Pensopay, which makes it possible to receive payment via forms. | https://pensopay.com/ |
1.1 GDPR #
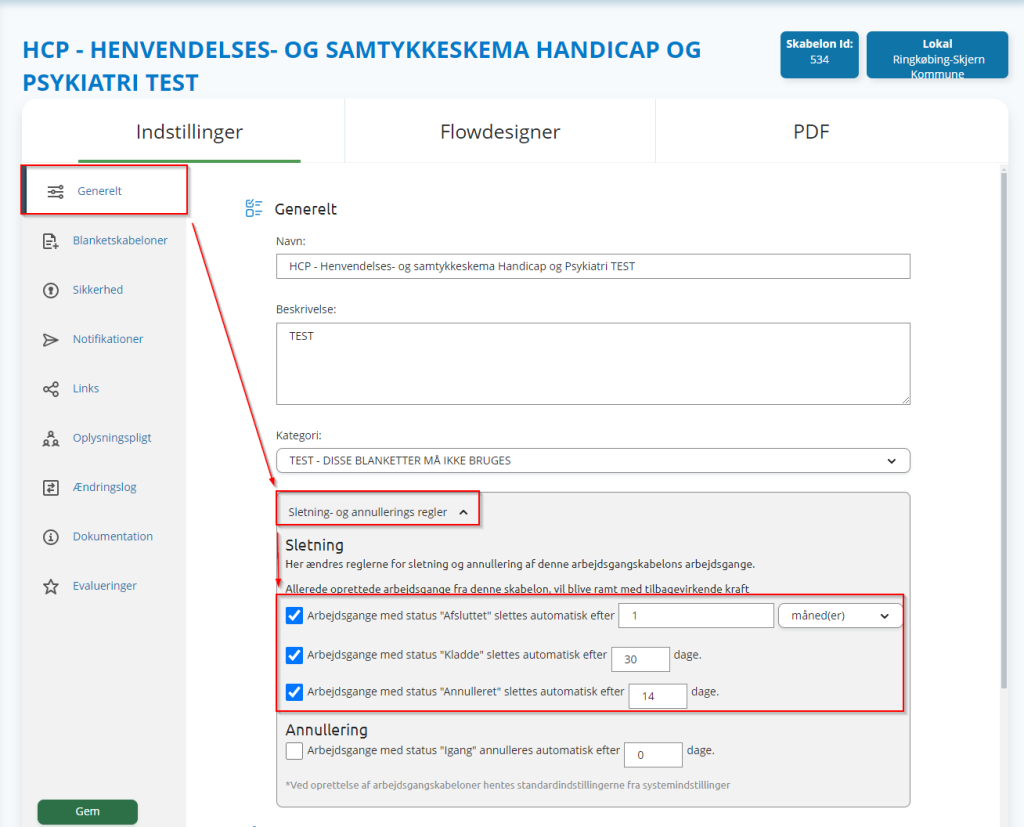
Since forms may contain sensitive information, they are covered by GDPR. In the workflow under Settings and General , you can set when forms should be deleted from XFlow. For the same reason, you should consider workflows with journaling as part of creating forms. RPA robots can optionally do this automatically via data deliveries, which can be sent to the robots’ mailboxes with a PDF attached.
2. General #
2.1 In brief #
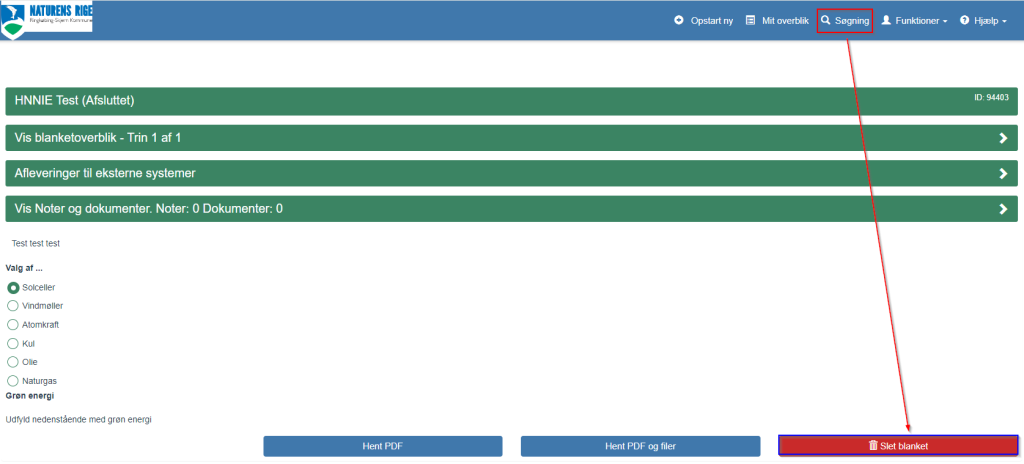
If you need to delete test forms, you can do this from the User Area , by searching for it and pressing Delete form , if you have the rights to do so . From here you can also download the form as a PDF, and any files attached to it.
In very rare cases, for one reason or another, the PDF form gets this content in a data submission. I suspect it is the service that converts the form to PDF that is out of order in these cases. You can always search for a form and download a new PDF if the accident happens. If you use forms in RPA, it might be a good idea to build error handling into this.

2.2 Merge field #
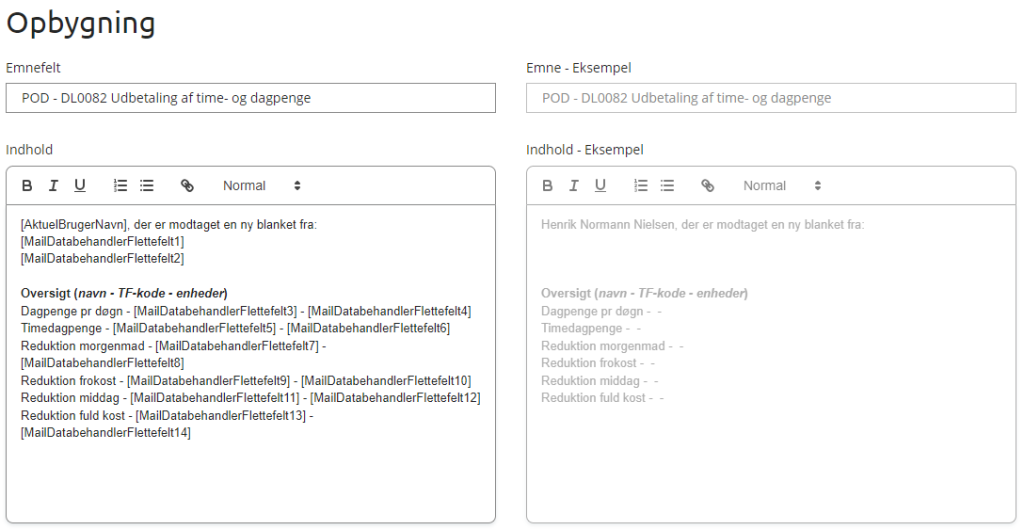
Merge fields can be used to insert values ( system, field, fixed ), for example, in email templates for data submissions. It is easiest to do this if you have both the email template and the workflow open at the same time.
In the email template, you fill in the form as normal, inserting the fields where they should be. They are written as [MailDatabehandlerFletteFeltX] in the picture.
In the workflow during data submission, which value belongs to which field is filled in. In this case, we take field values from elements in form templates that are part of the workflow. MergeField1 is [MailDatabehandlerFletteFelt1] in the email template.
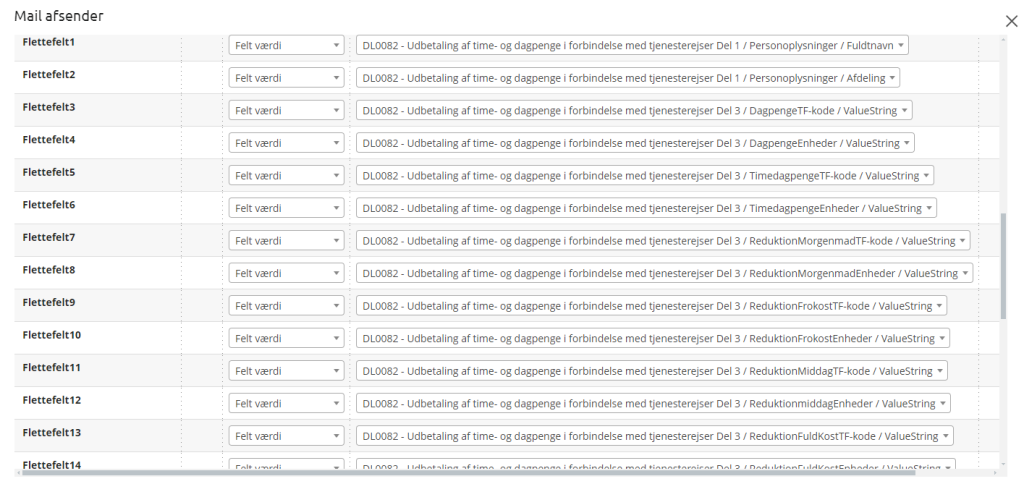
The result from this example looks like this in the email.

To make it more manageable, you can reserve some merge fields specifically for the same thing always. This can make it more manageable, and easier to read/understand across many templates.
| Merge field | To |
| 1 | Subject field in email |
| 2 | Approver (from approver activity) |
| 3 | Leader |
| 4 | Person (Anything other than an approver/manager, and only fill in if the fixed fields do not cover the need) |
| 5 | Completed on behalf of (unless the form is about a start-up) |
| 6 | Subject system |
| 7 | Message in content* |
| 8 | Reserved for future use |
| 9 | Reserved for future use |
| 10 | Reserved for future use |
2.3 JSON file for RPA #
JSON is built from the forms that are part of a workflow.

Normally you would read the contents of the JSON file and then convert it to a custom object , as the robot can work with this better. Under forms you will find the completed forms with values.

Please note that they are in the reverse order of completion.

Each individual form has this general outline around it.

The elements appear in the same order as in the form template.

The field name of the element is the identifier in the JSON file, and values is what is filled in. If you have an element that can have children , they will also appear.
Marked in green will be the filled in one of the two options in the example. In purple there is a container that contains the new elements. This cannot be named and is autogenerated. Its children, marked in blue, contain the actual elements that are shown. In addition, you can have several elements that have sub-elements, which you can then navigate further down.
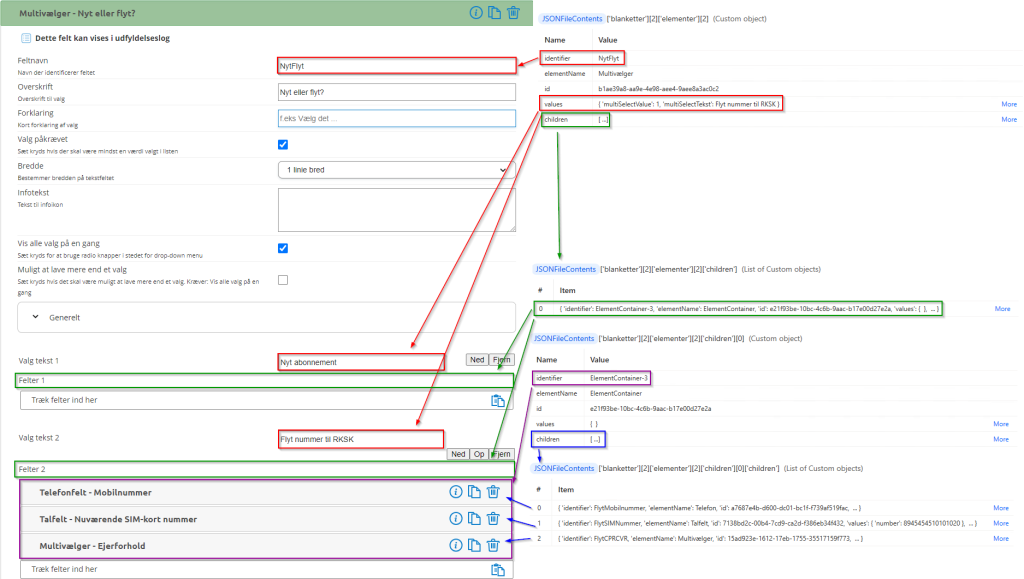
From the JSON file, you can also iterate the sub-forms, if you have set up a step guide, for example. It could look like the one below, which differentiates between two forms (one for ordering which has a step guide and one for changes which does not ) that are received in a shared mailbox.

3. Form templates #
3.1 In brief #
Form templates are built by dragging and dropping fields onto the Content . Each field has standard options such as required , info text , and field name . The latter is especially important if you want to create merge fields or use JSON files in your data submission. This makes it much easier to find what you are looking for by naming it something meaningful.
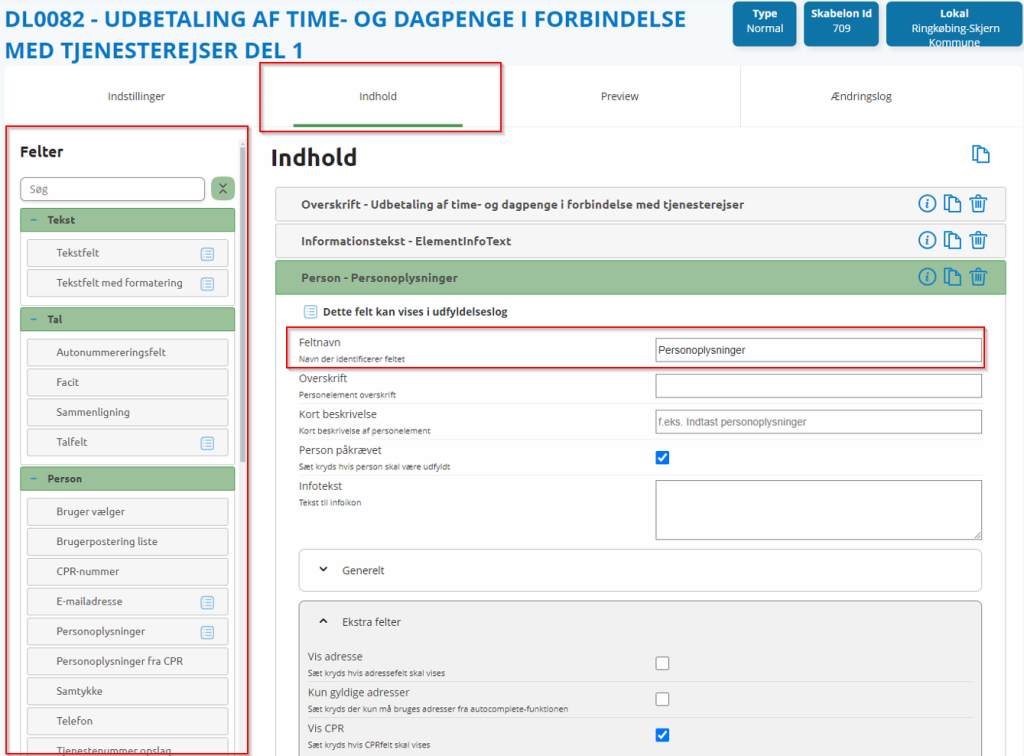
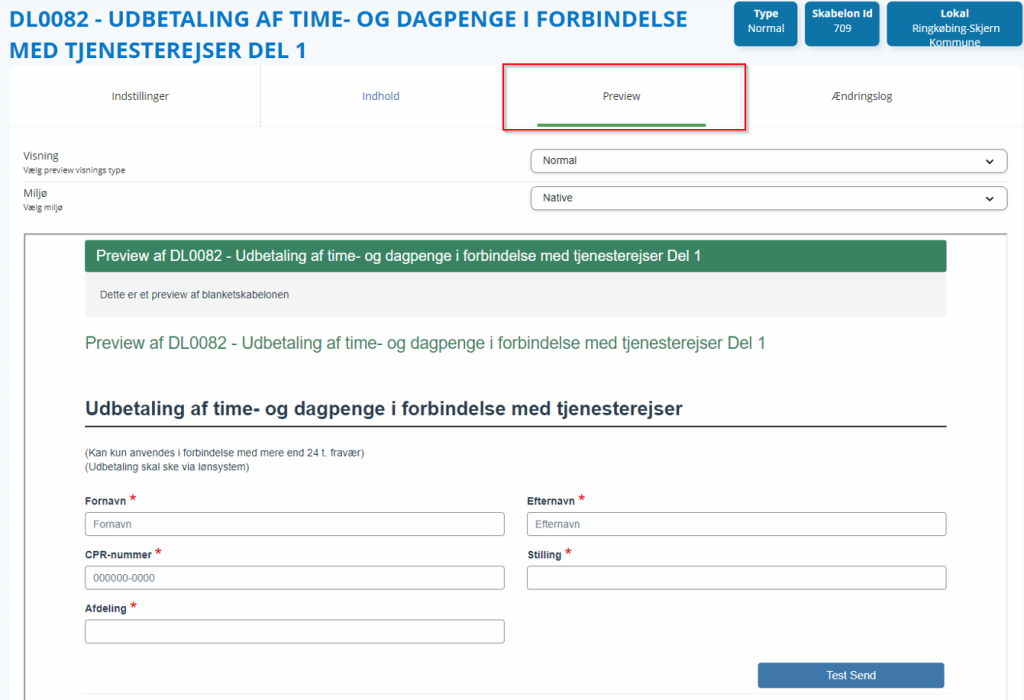
Furthermore, under Preview you can see how the form looks and fill it out / test whether it works as intended.
3.2 Result field #
Result fields are used to perform simple calculations in the form. Please note that if you divide your forms into parts and assemble them in a step guide, the calculations will still work. A result field can consist of a calculation key ( it can be thought of as a list of values ) and a calculation result key which is used in conjunction with a calculation operator for calculations.
A calculation key can be thought of as a list that has numbers and decimals in it.

When a calculation is to be made, we insert the calculation key as a calculation result key with a given calculation operator . Then, all numbers from the list are put together with this operator. For this reason, you must be particularly careful to split your calculations into several calculation keys if different calculation operators are to be used.

It may look like this, where under General you have the option to set a default value in the field.

If you wanted to calculate meeting allowances for employees, you would need to use the amount they are paid per meeting, as well as the number of meetings they attend. Below is a form for the example. We create a calculation key called DIÆT , and add the amount and number of meetings.
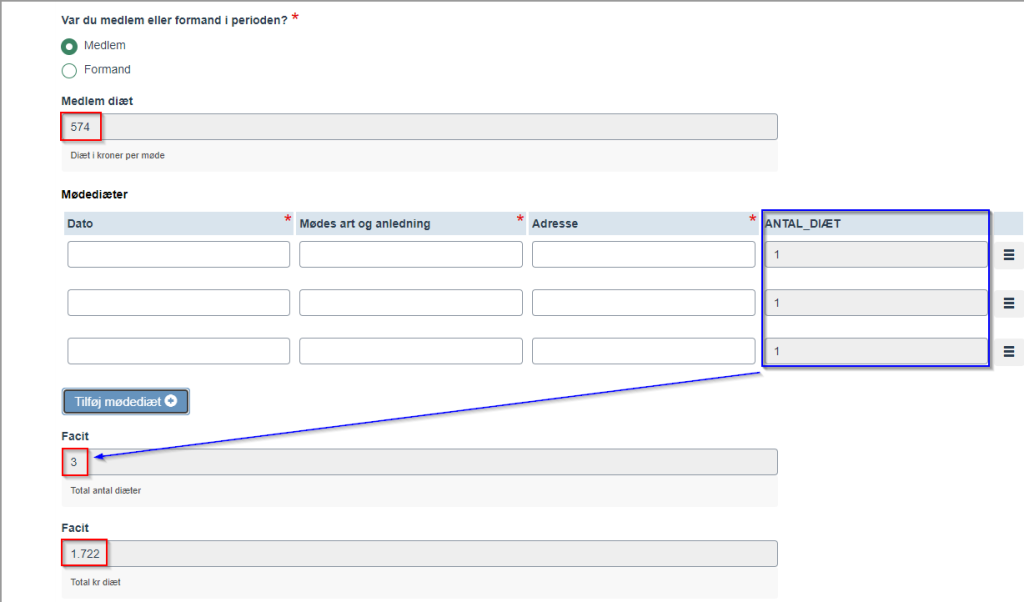
To find the total number of meetings, however, we need to do an intermediate calculation that finds these. We have created a calculation key in the table called ANTAL_DIÆT . To calculate this together, it can be used as a calculation result key with a + operator. We then get the total number, and we can then store it in the calculation key DIÆT .

The calculation key DIET now contains two values - the amount and the total number of meetings. These can be multiplied together subsequently to get the total amount. Since this is a final result, there is no need to save the value in a calculation key . If you want to use the amount for other calculations, you must still save it.

3.3 Multi-selector and Comparison field #
There may be cases where a multiselector has many choices, where some choices should show the same elements subsequently. This can be for both radio buttons as well as checkboxes. To make maintenance easier, and not have to copy-paste a lot, you can use comparison fields . This can also make it easier for RPA robots later if they need to read a JSON file, so you can save on the code for logic.

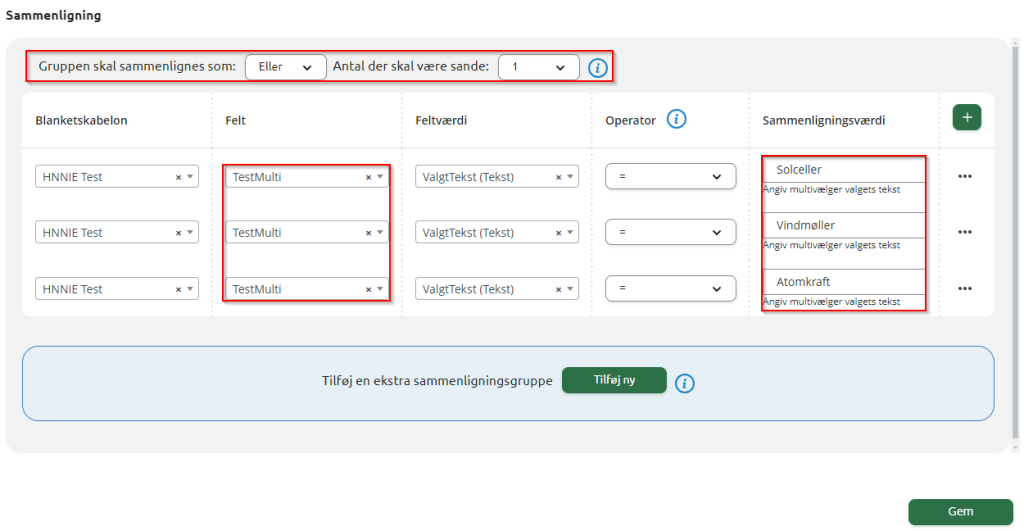
For example, a comparison field might look like this, where we insert the elements under True fields .

The Setup itself may look like this, where we display the elements based on the selection in the multi selector.
3.4 Comparison field in partial forms spread over activities #
Comparison fields do not work directly between subforms that are spread across multiple activities. An example below is the Start activity where we perform Part 1, and the Fill in activity where we fill in Part 2. You cannot compare fields in Part 2 from Part 1 without it always giving a false value. However, you can use a subform where you additionally set up comparison fields that are displayed ( not physically, they are behind the code ) on both activities during any step. Furthermore, the comparison form must always be set to Show in both activities ( it is possible to set Readonly to the Fill in step in this example, since the comparison is made with a field from Part 1) .

Including the content of the comparison form. Please note that we can only touch on true / false values in part 2, and in cases with multi-selectors we have to create one per option if later we want to display elements specifically for these items.

4. Workflow templates #
4.1 In brief #
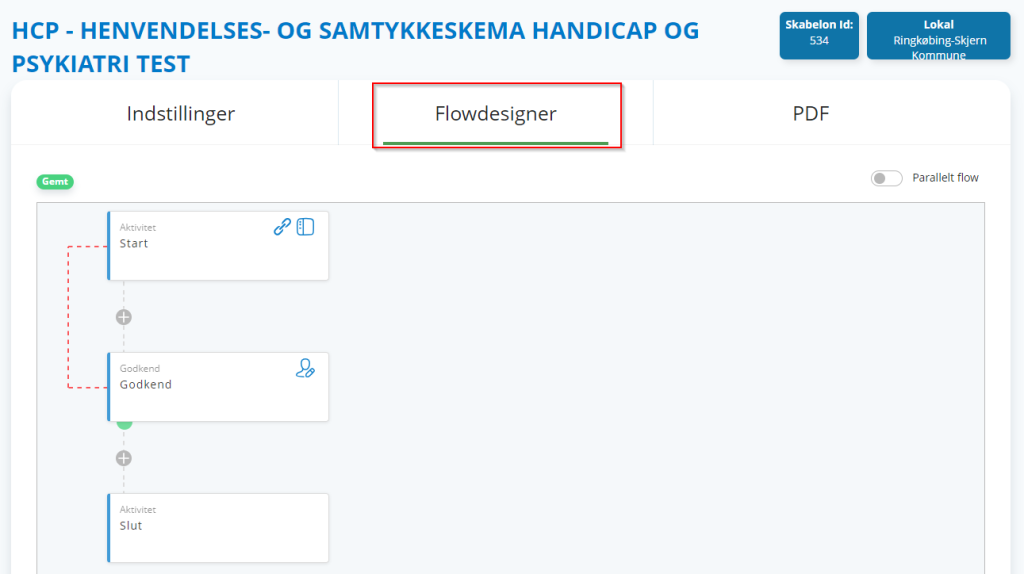
In Flow Designer you can build the flow itself with activities ( Fill, approve, data submission ). As a note, there will always be a Start ( fill ) and End ( data submission ) activity. In the approve step you can also choose what should happen if a form is rejected. For example, like the one below, where it goes back to the fill step.
4.2 Step guide #
A step guide can be used if you are creating partial forms instead of one large one. This makes it easier for the person filling in the form to understand, and allows you to make corrections early if something is missing or not filled in correctly.
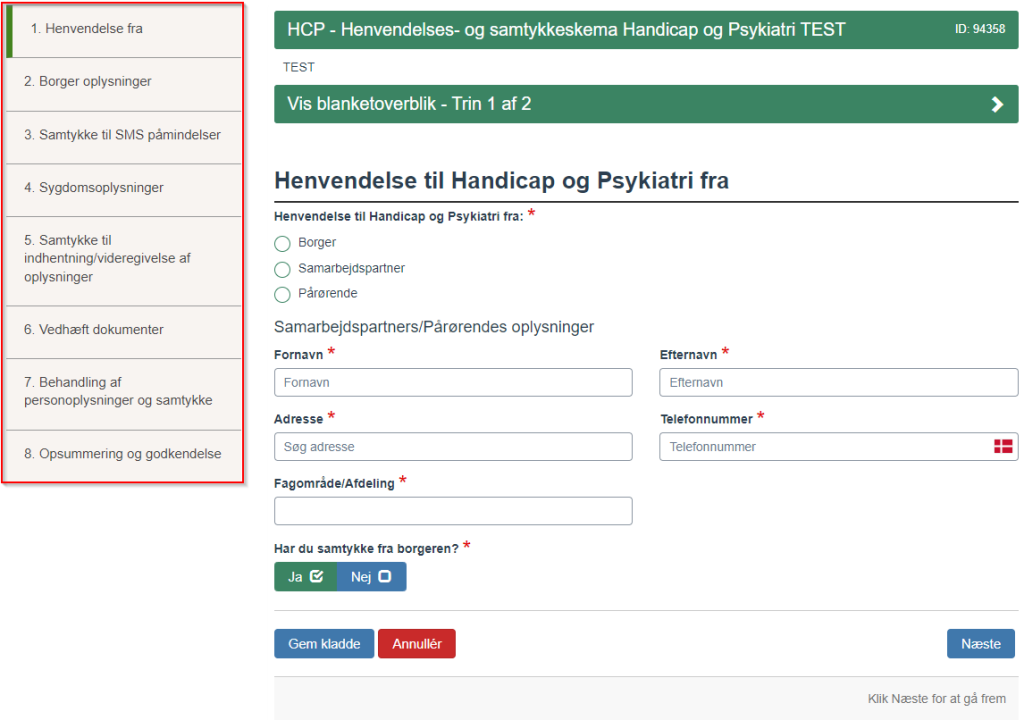
Under Flow Designer, click on the activity that should have a step guide, and then under Settings, enable Step Guide and click on it.
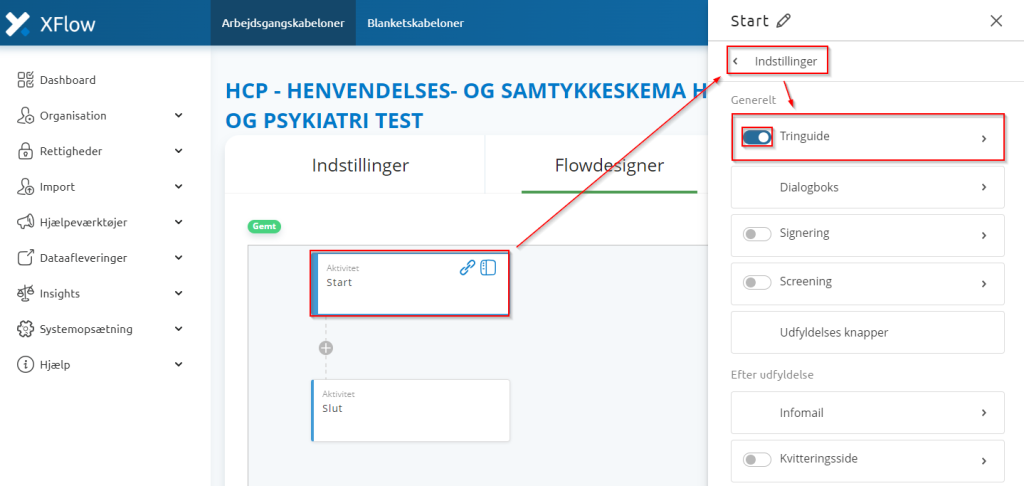
From here you can either create a step per form template or create your own. Subsequently, you associate steps to each individual form template (showing those that are already associated with the workflow ) .

Additionally, by clicking on the pencil next to the step, you can choose whether there should be a condition for a step to be displayed. This is based on choices in the Yes/No , Multiselect , and Comparison fields.

4.3 Data submission attach files #
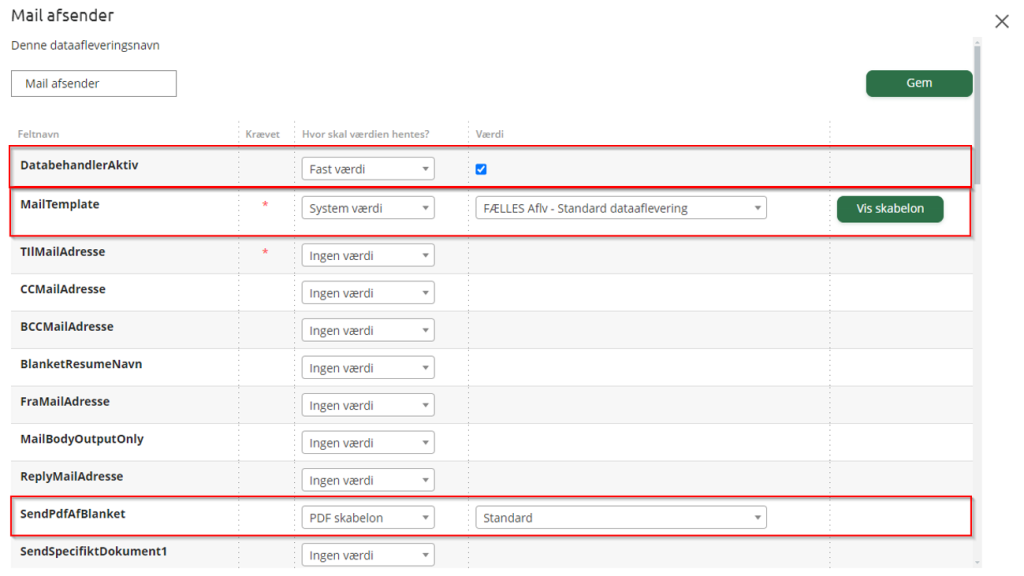
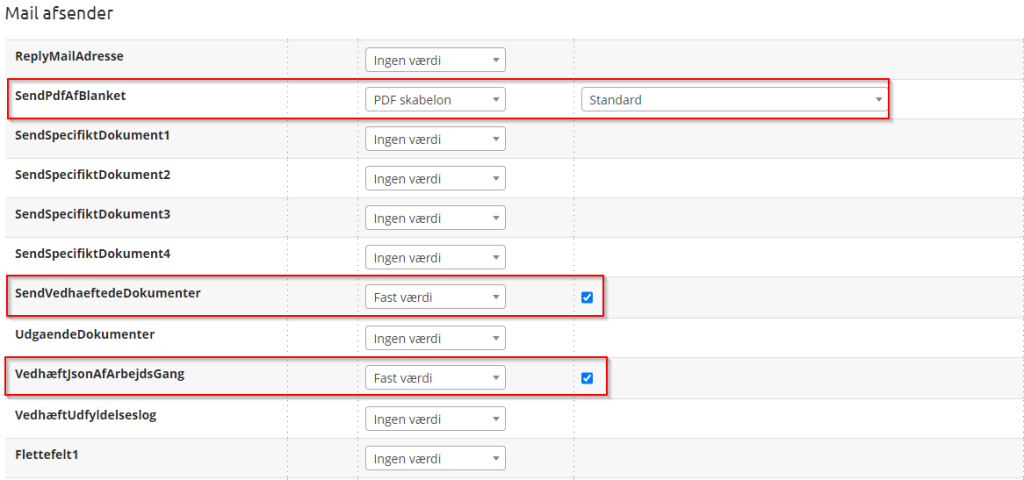
In data submissions, you can attach files, for example in Mail sender . Here you can attach a PDF of the completed template, any uploaded documents from the form, and a JSON file of the form ( used primarily for RPA purposes ).
5. Message templates #
Message templates can be created under Organization – Message Templates .

5.1 Info email template for activity #
Out of consideration for citizens who may be exempt from digital mail, we have chosen not to use infomail, as these will then fail and stop a workflow, as infomail cannot be turned on at a final activity. It is therefore less problematic if a data submission fails at its final activity, as the rest of the workflow is done in that case.
Please note that the infomail is sent to the message channel you have selected under Organization – Settings – Message .
There are three options:
- Email that only works if you register emails for internal and external users.
- Digital Post is only used for the regions.
- Mail to the ServicePlatform corresponds to digital mail in the municipalities.

In the work template under Flowdesigner – Settings – Infomail, you can set up automatic emails that are sent after the activity is completed.
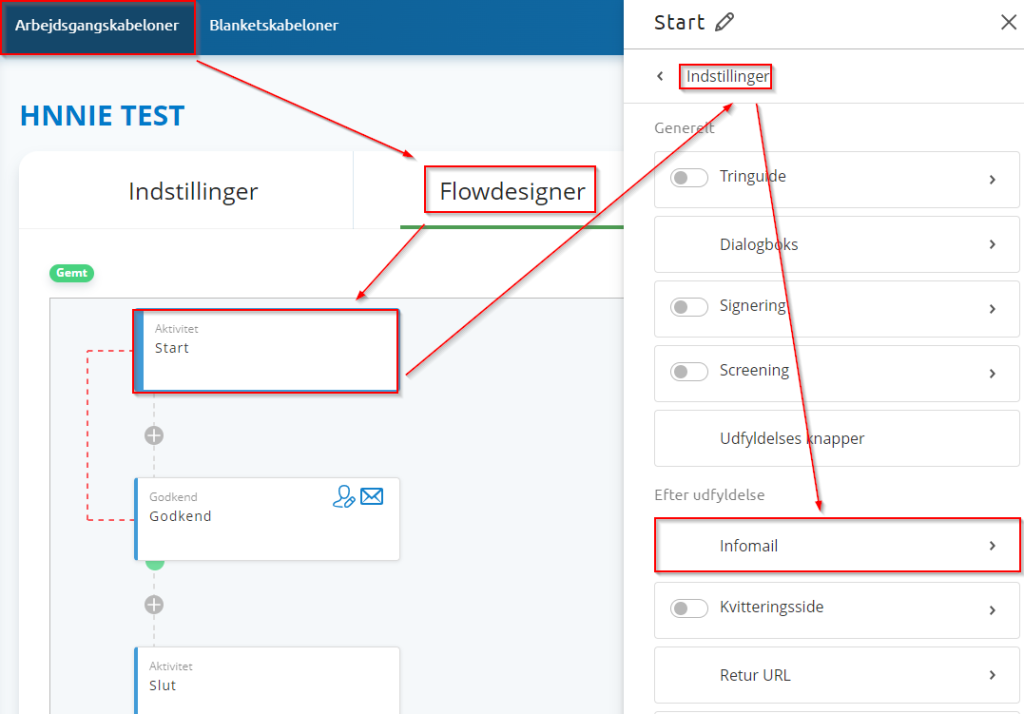
The window that needs to be filled out looks like this.

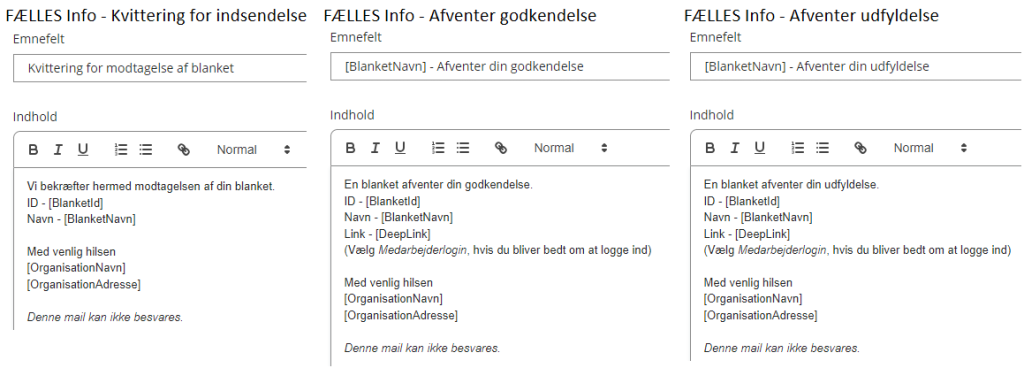
Below are examples of standard email deliveries.

5.2 Mail delivery #
An email delivery can be set up as a data delivery activity or by default always in the End activity. Press Add data delivery and select from Mail sender . If you want to send to e-Boks you can use a Digitalpost sender instead. The next step will be very similar.
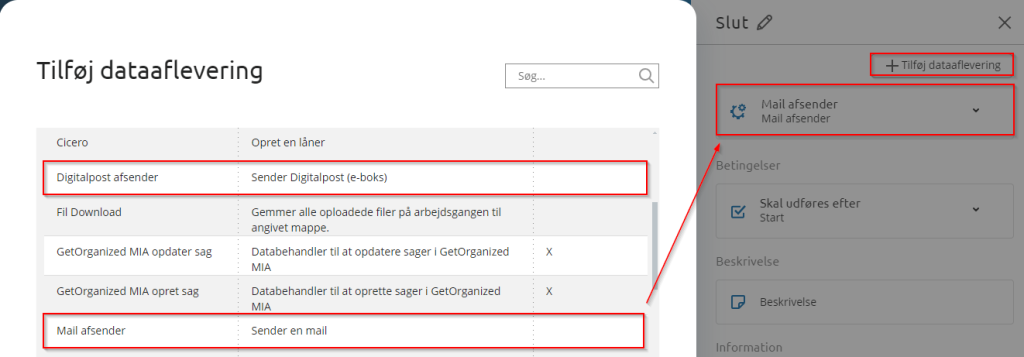
Open Mail Sender and then you can fill out the MailTemplate with the template you want to use. You can also attach files, for example a PDF of the form.
For example, if an email should only be sent if something is checked in the form, you can turn DataProcessorActive into a field value and point to the option that should trigger it.
